 # Activate License Key
Source: https://docs.creem.io/api-reference/endpoint/activate-license
post /v1/licenses/activate
# Cancel Subscription
Source: https://docs.creem.io/api-reference/endpoint/cancel-subscription
post /v1/subscriptions/{id}/cancel
# Create Checkout Session
Source: https://docs.creem.io/api-reference/endpoint/create-checkout
post /v1/checkouts
# Create Discount Code
Source: https://docs.creem.io/api-reference/endpoint/create-discount-code
post /v1/discounts
# Create Product
Source: https://docs.creem.io/api-reference/endpoint/create-product
post /v1/products
# Deactivate License Key
Source: https://docs.creem.io/api-reference/endpoint/deactivate-license
post /v1/licenses/deactivate
# Delete Discount Code
Source: https://docs.creem.io/api-reference/endpoint/delete-discount-code
delete /v1/discounts/{id}/delete
# Get Checkout Session
Source: https://docs.creem.io/api-reference/endpoint/get-checkout
get /v1/checkouts
# Get Customer
Source: https://docs.creem.io/api-reference/endpoint/get-customer
get /v1/customers
# Get Discount Code
Source: https://docs.creem.io/api-reference/endpoint/get-discount-code
get /v1/discounts
# Get Product
Source: https://docs.creem.io/api-reference/endpoint/get-product
get /v1/products
# Get Subscription
Source: https://docs.creem.io/api-reference/endpoint/get-subscription
get /v1/subscriptions
# List Transactions
Source: https://docs.creem.io/api-reference/endpoint/get-transactions
get /v1/transactions/search
# List Products
Source: https://docs.creem.io/api-reference/endpoint/search-products
get /v1/products/search
# Update Subscription
Source: https://docs.creem.io/api-reference/endpoint/update-subscription
post /v1/subscriptions/{id}
# Upgrade Subscription
Source: https://docs.creem.io/api-reference/endpoint/upgrade-subscription
post /v1/subscriptions/{id}/upgrade
# Validate License Key
Source: https://docs.creem.io/api-reference/endpoint/validate-license
post /v1/licenses/validate
# Introduction
Source: https://docs.creem.io/api-reference/introduction
Understand general concepts, response codes, and authentication strategies.
## Base URL
The Creem API is built on REST principles. We enforce HTTPS in every request to improve data security, integrity, and privacy. The API does not support HTTP.
All requests contain the following base URL:
```http
https://api.creem.io
```
## Authentication
To authenticate you need to add an `x-api-key` header with the contents of the header being your API Key.
All API endpoints are authenticated using Api Keys and picked up from the specification file.
```json
{
"headers": {
"x-api-key": "creem_123456789"
}
}
```
## Response codes
Creem uses standard HTTP codes to indicate the success or failure of your requests.
In general, 2xx HTTP codes correspond to success, 4xx codes are for user-related failures, and 5xx codes are for infrastructure issues.
| Status | Description |
| ------ | --------------------------------------- |
| 200 | Successful request. |
| 400 | Check that the parameters were correct. |
| 401 | The API key used was missing. |
| 403 | The API key used was invalid. |
| 404 | The resource was not found. |
| 429 | The rate limit was exceeded. |
| 500 | Indicates an error with Creem servers. |
# Standard Integration
Source: https://docs.creem.io/checkout-flow
Learn how to receive payments on your application
## Prerequisites
To get the most out of this guide, you'll need to:
* **Create an account on Creem.io**
* **Have your API key ready**
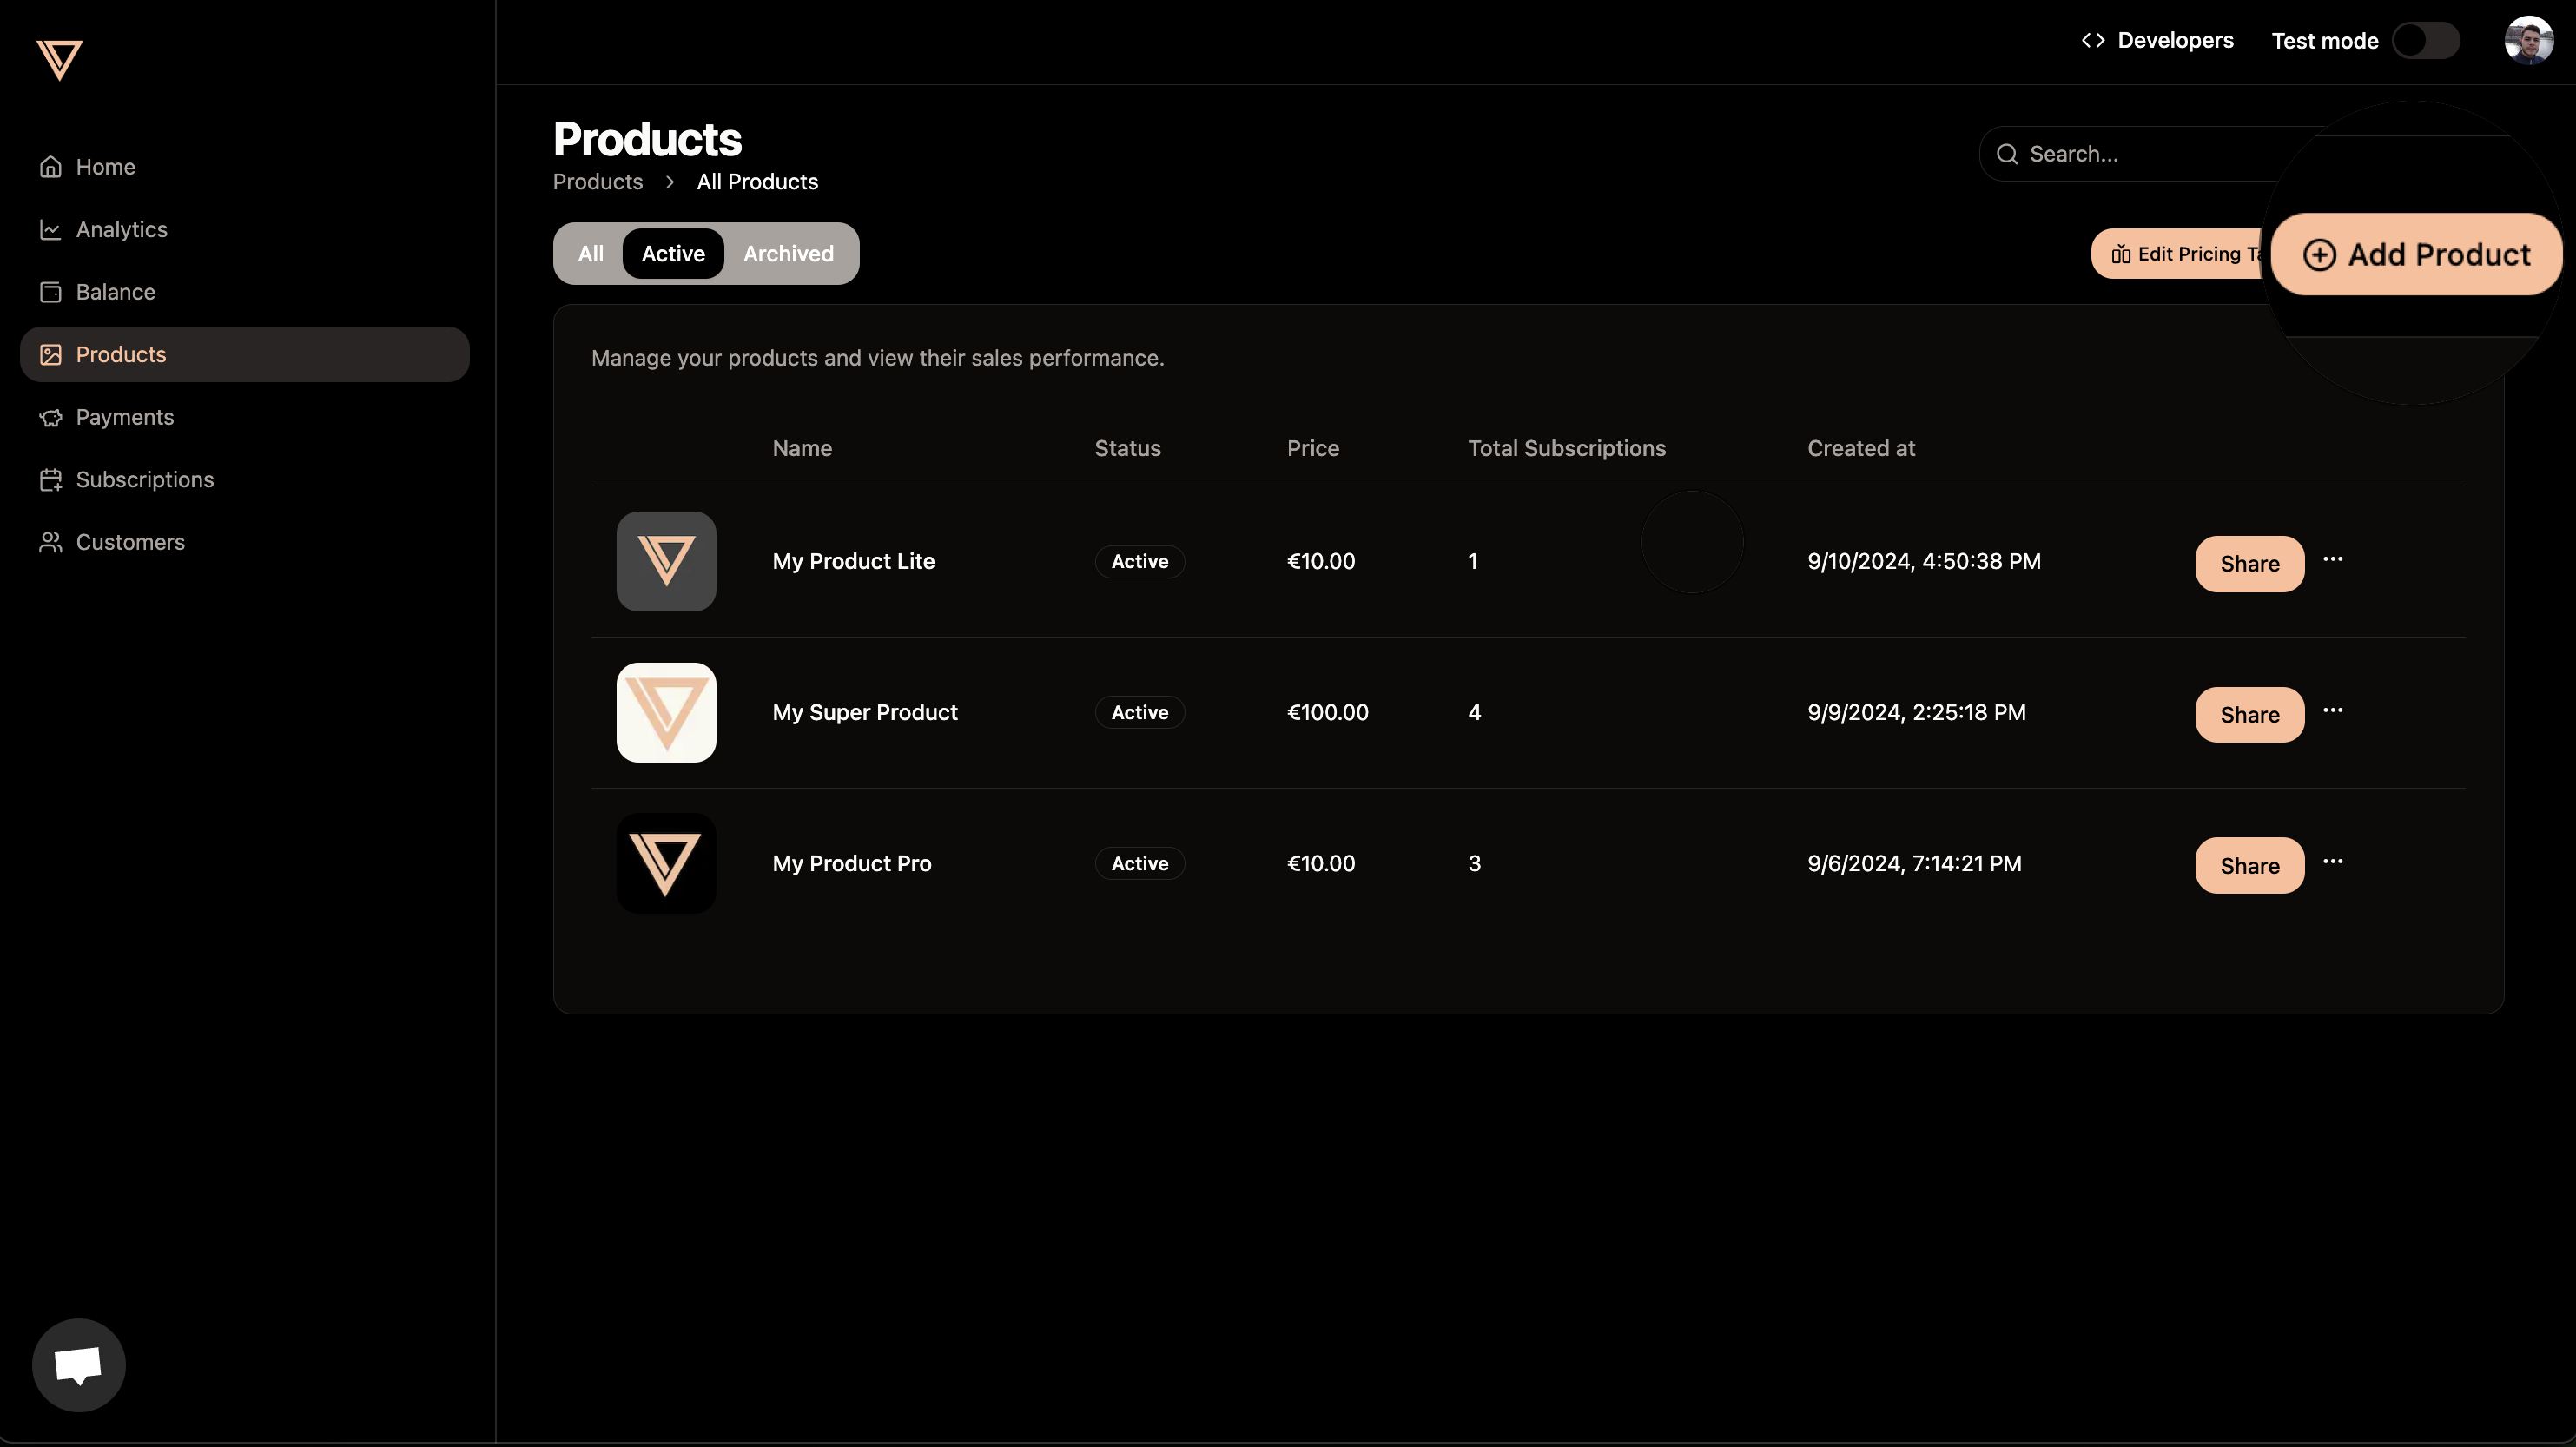
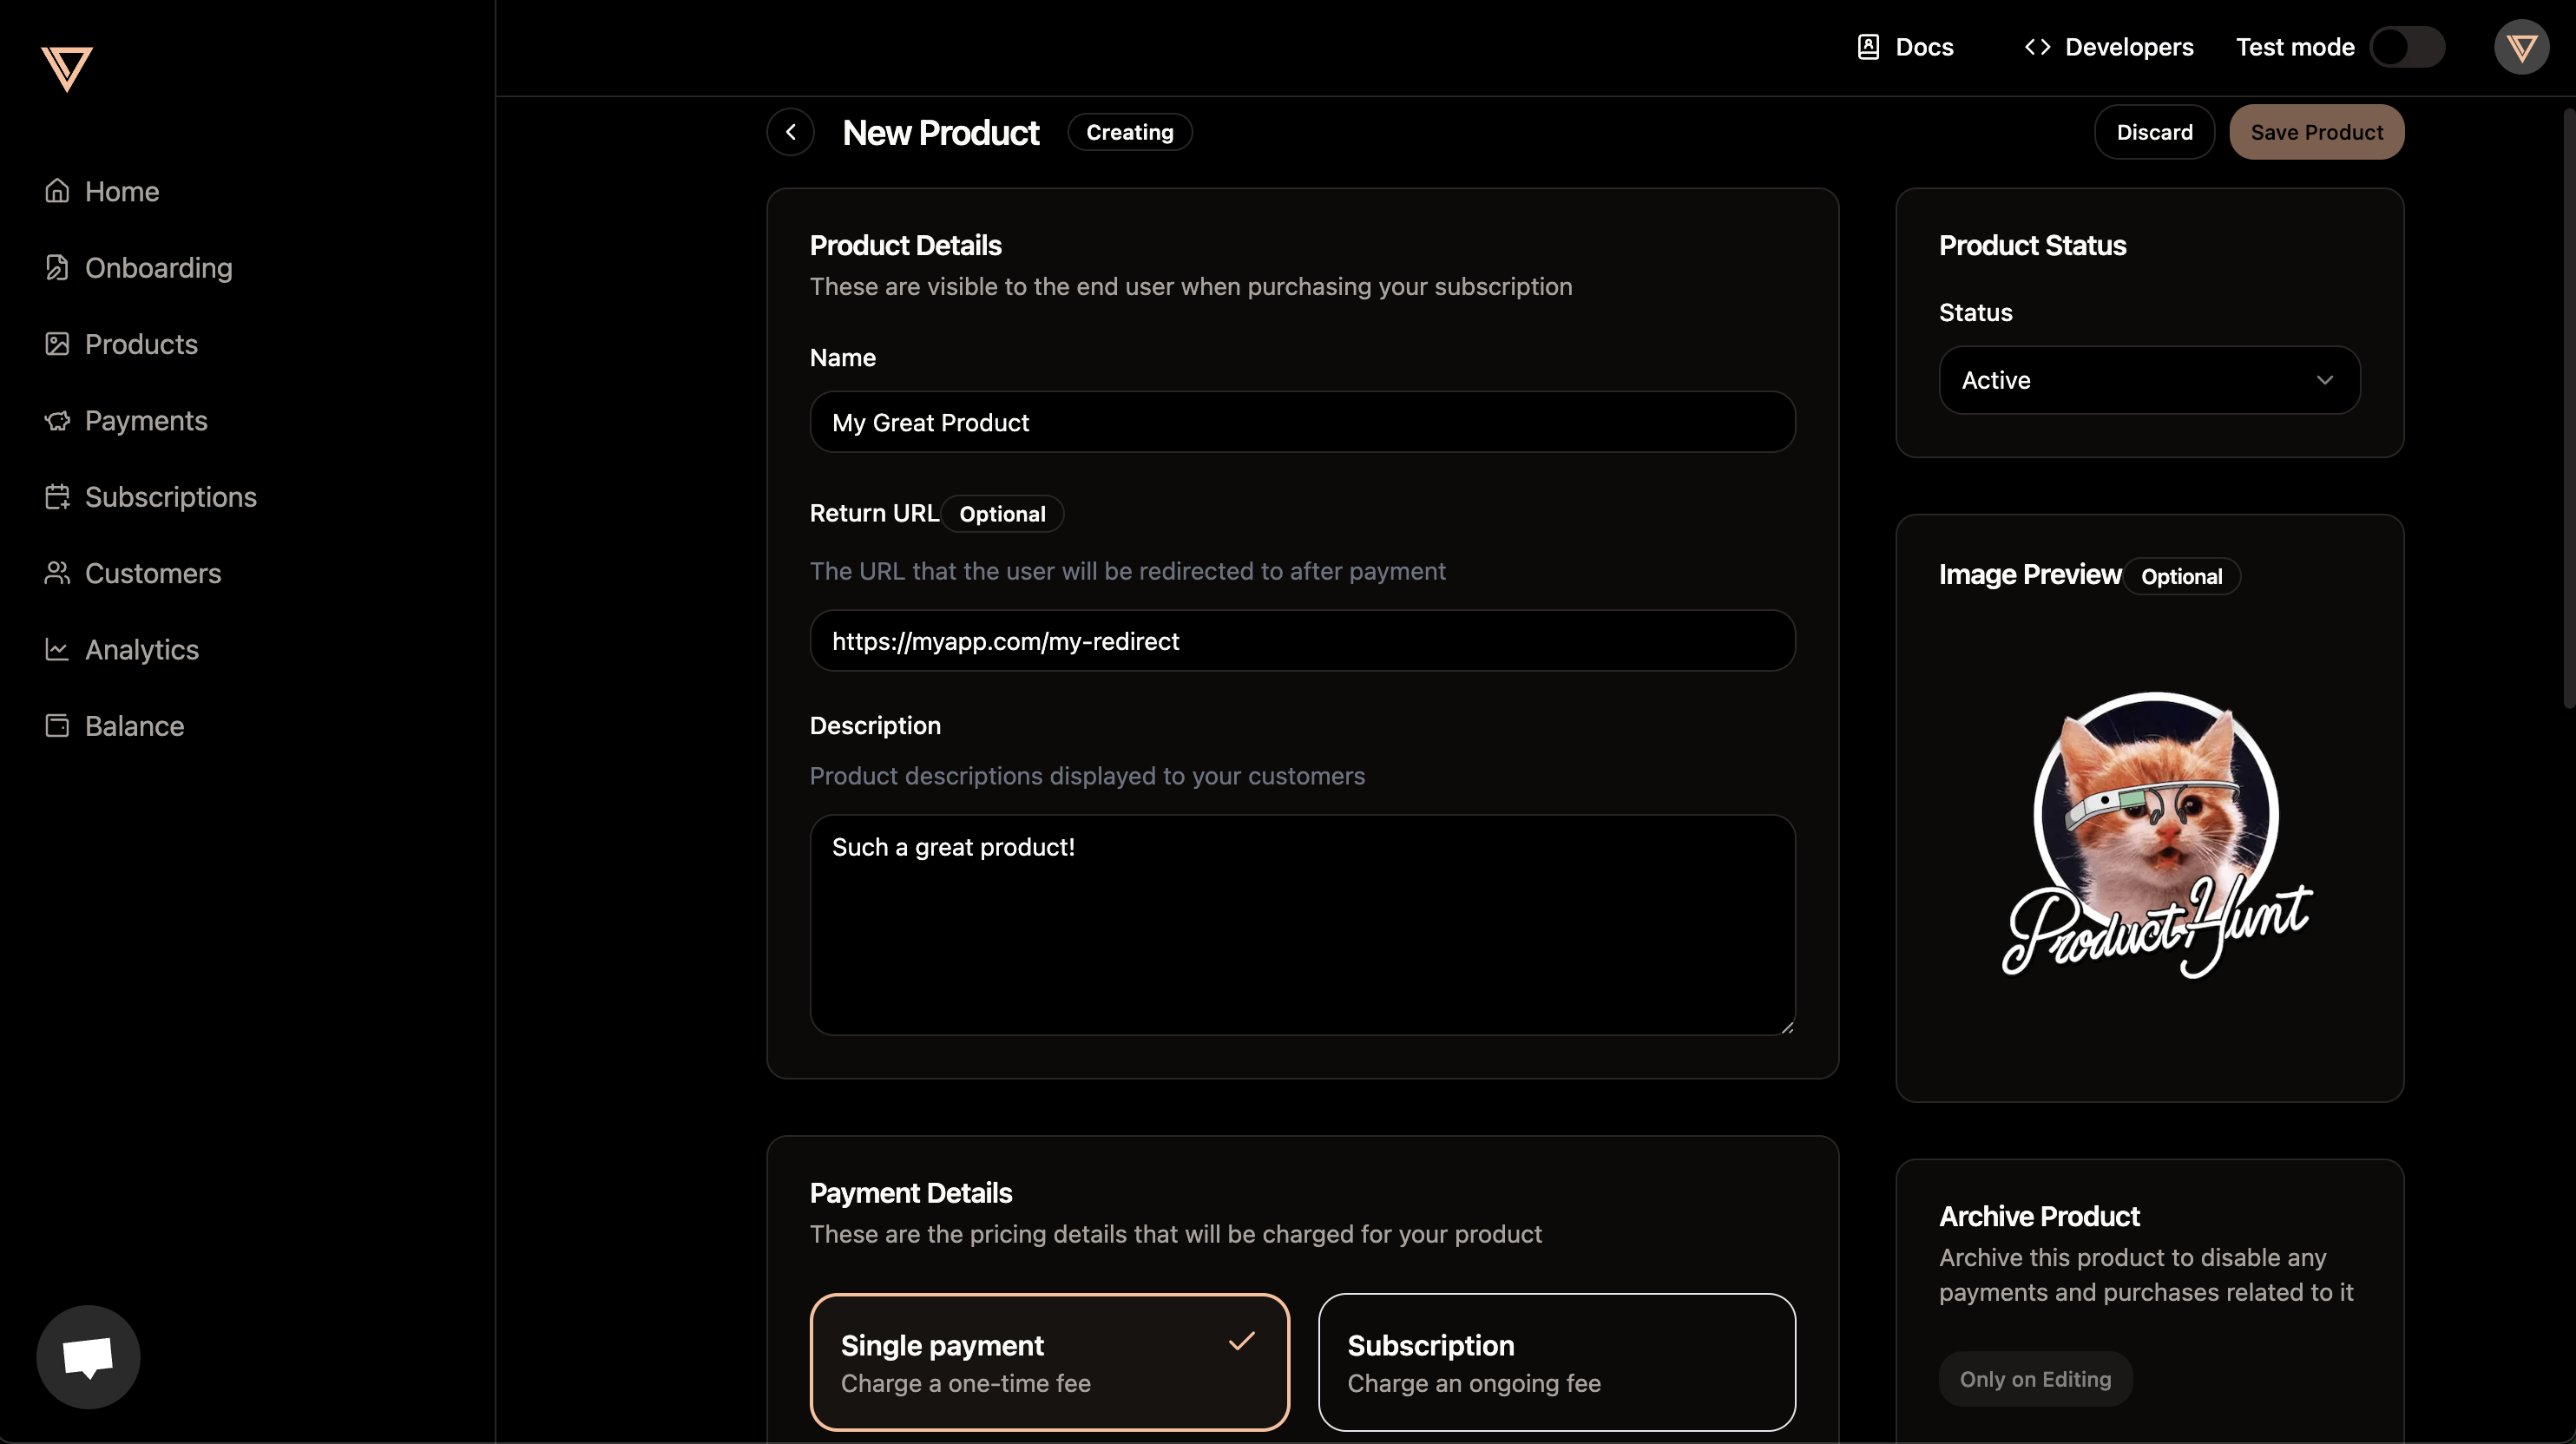
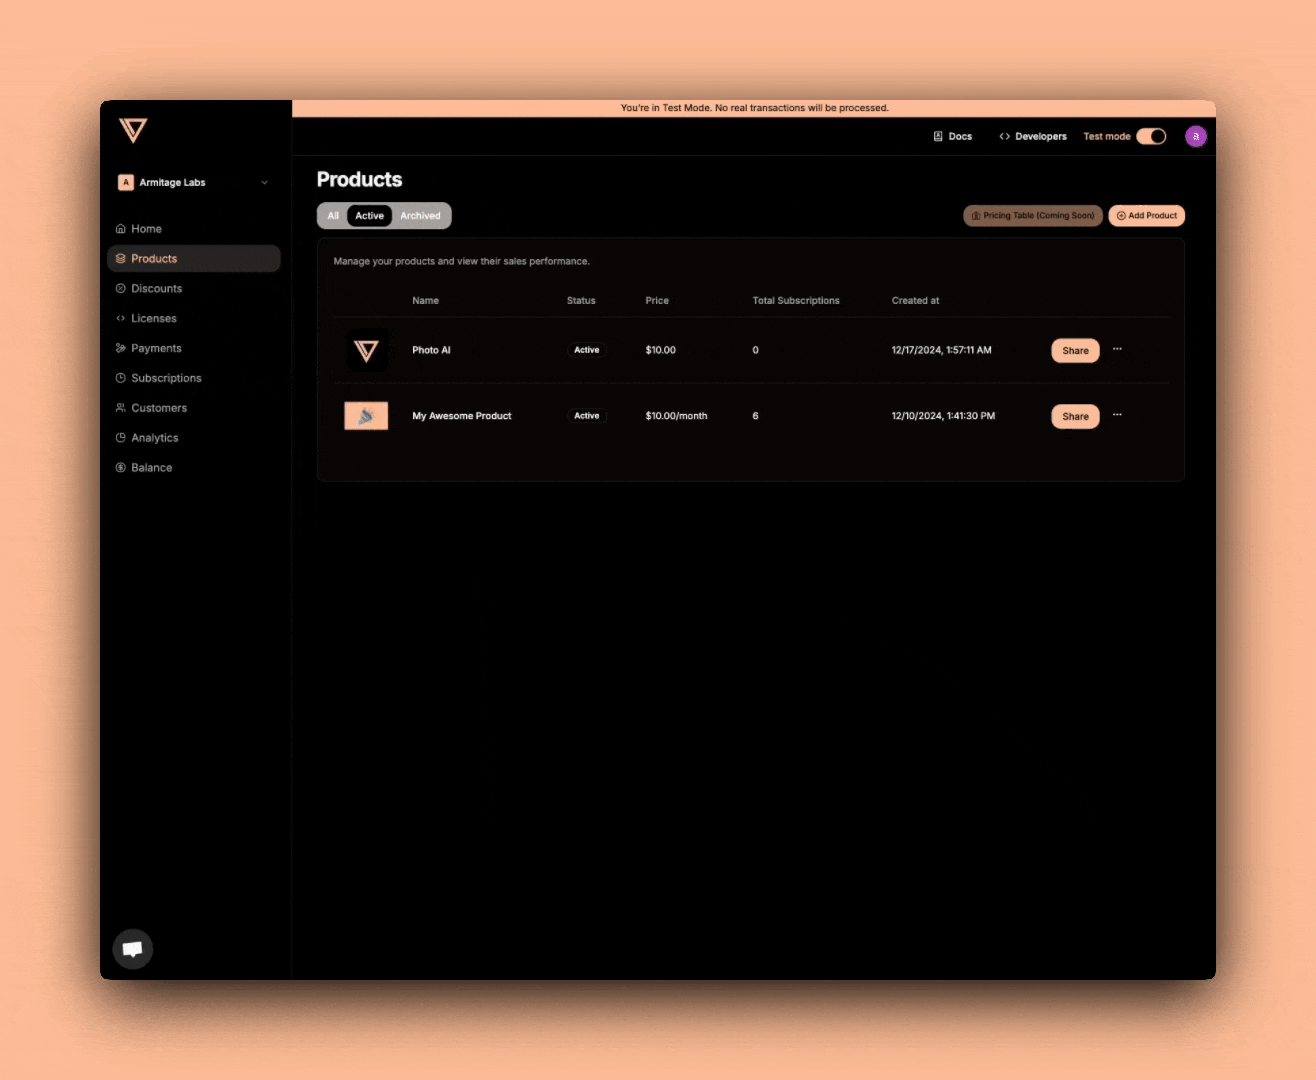
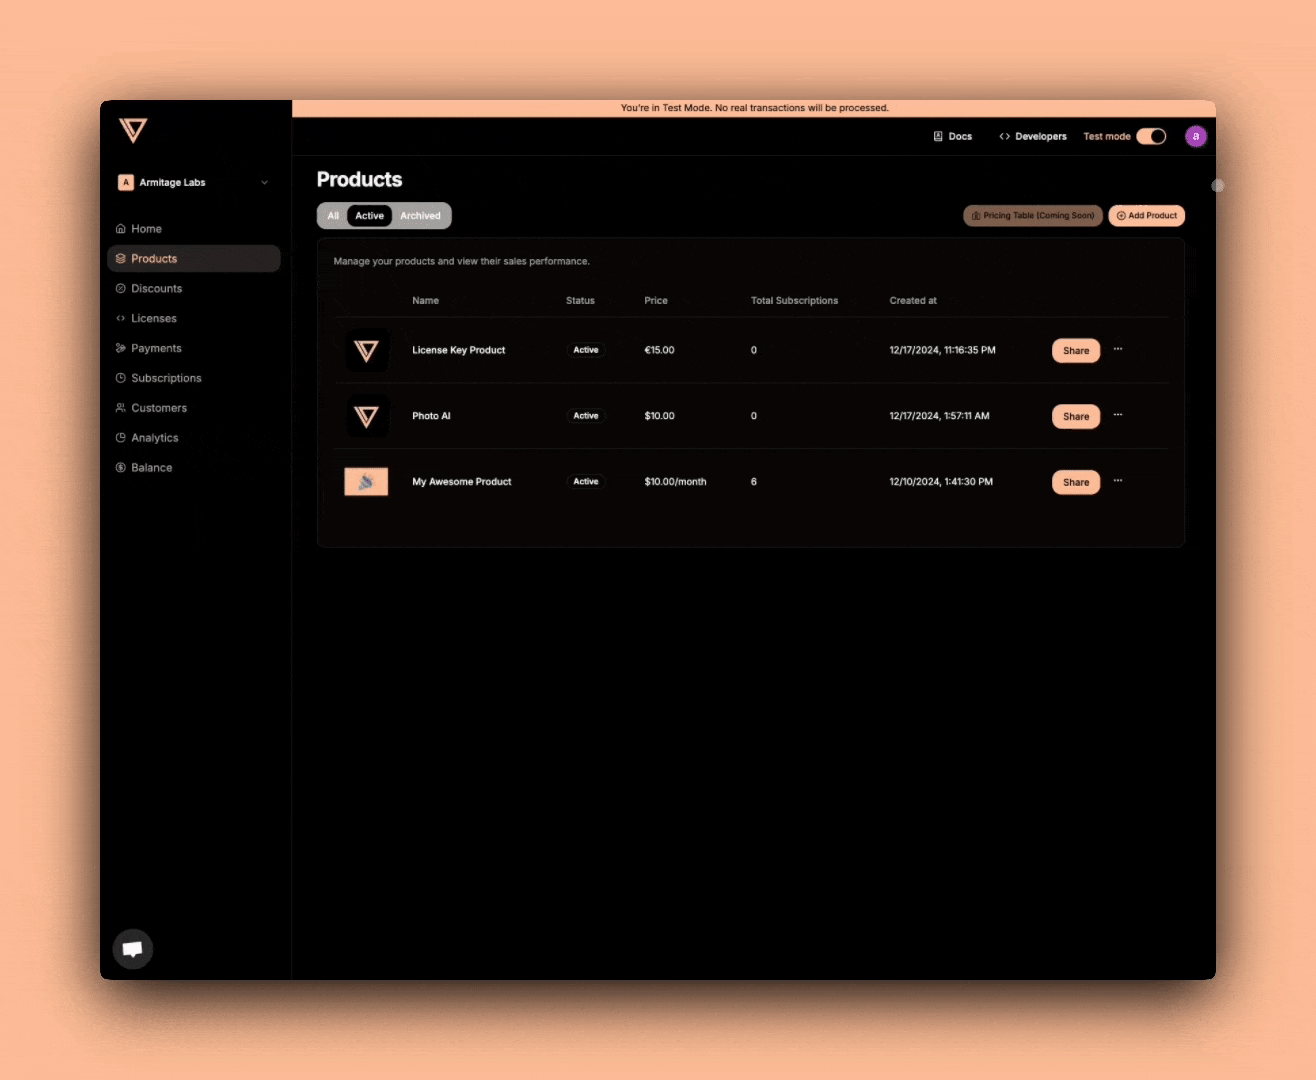
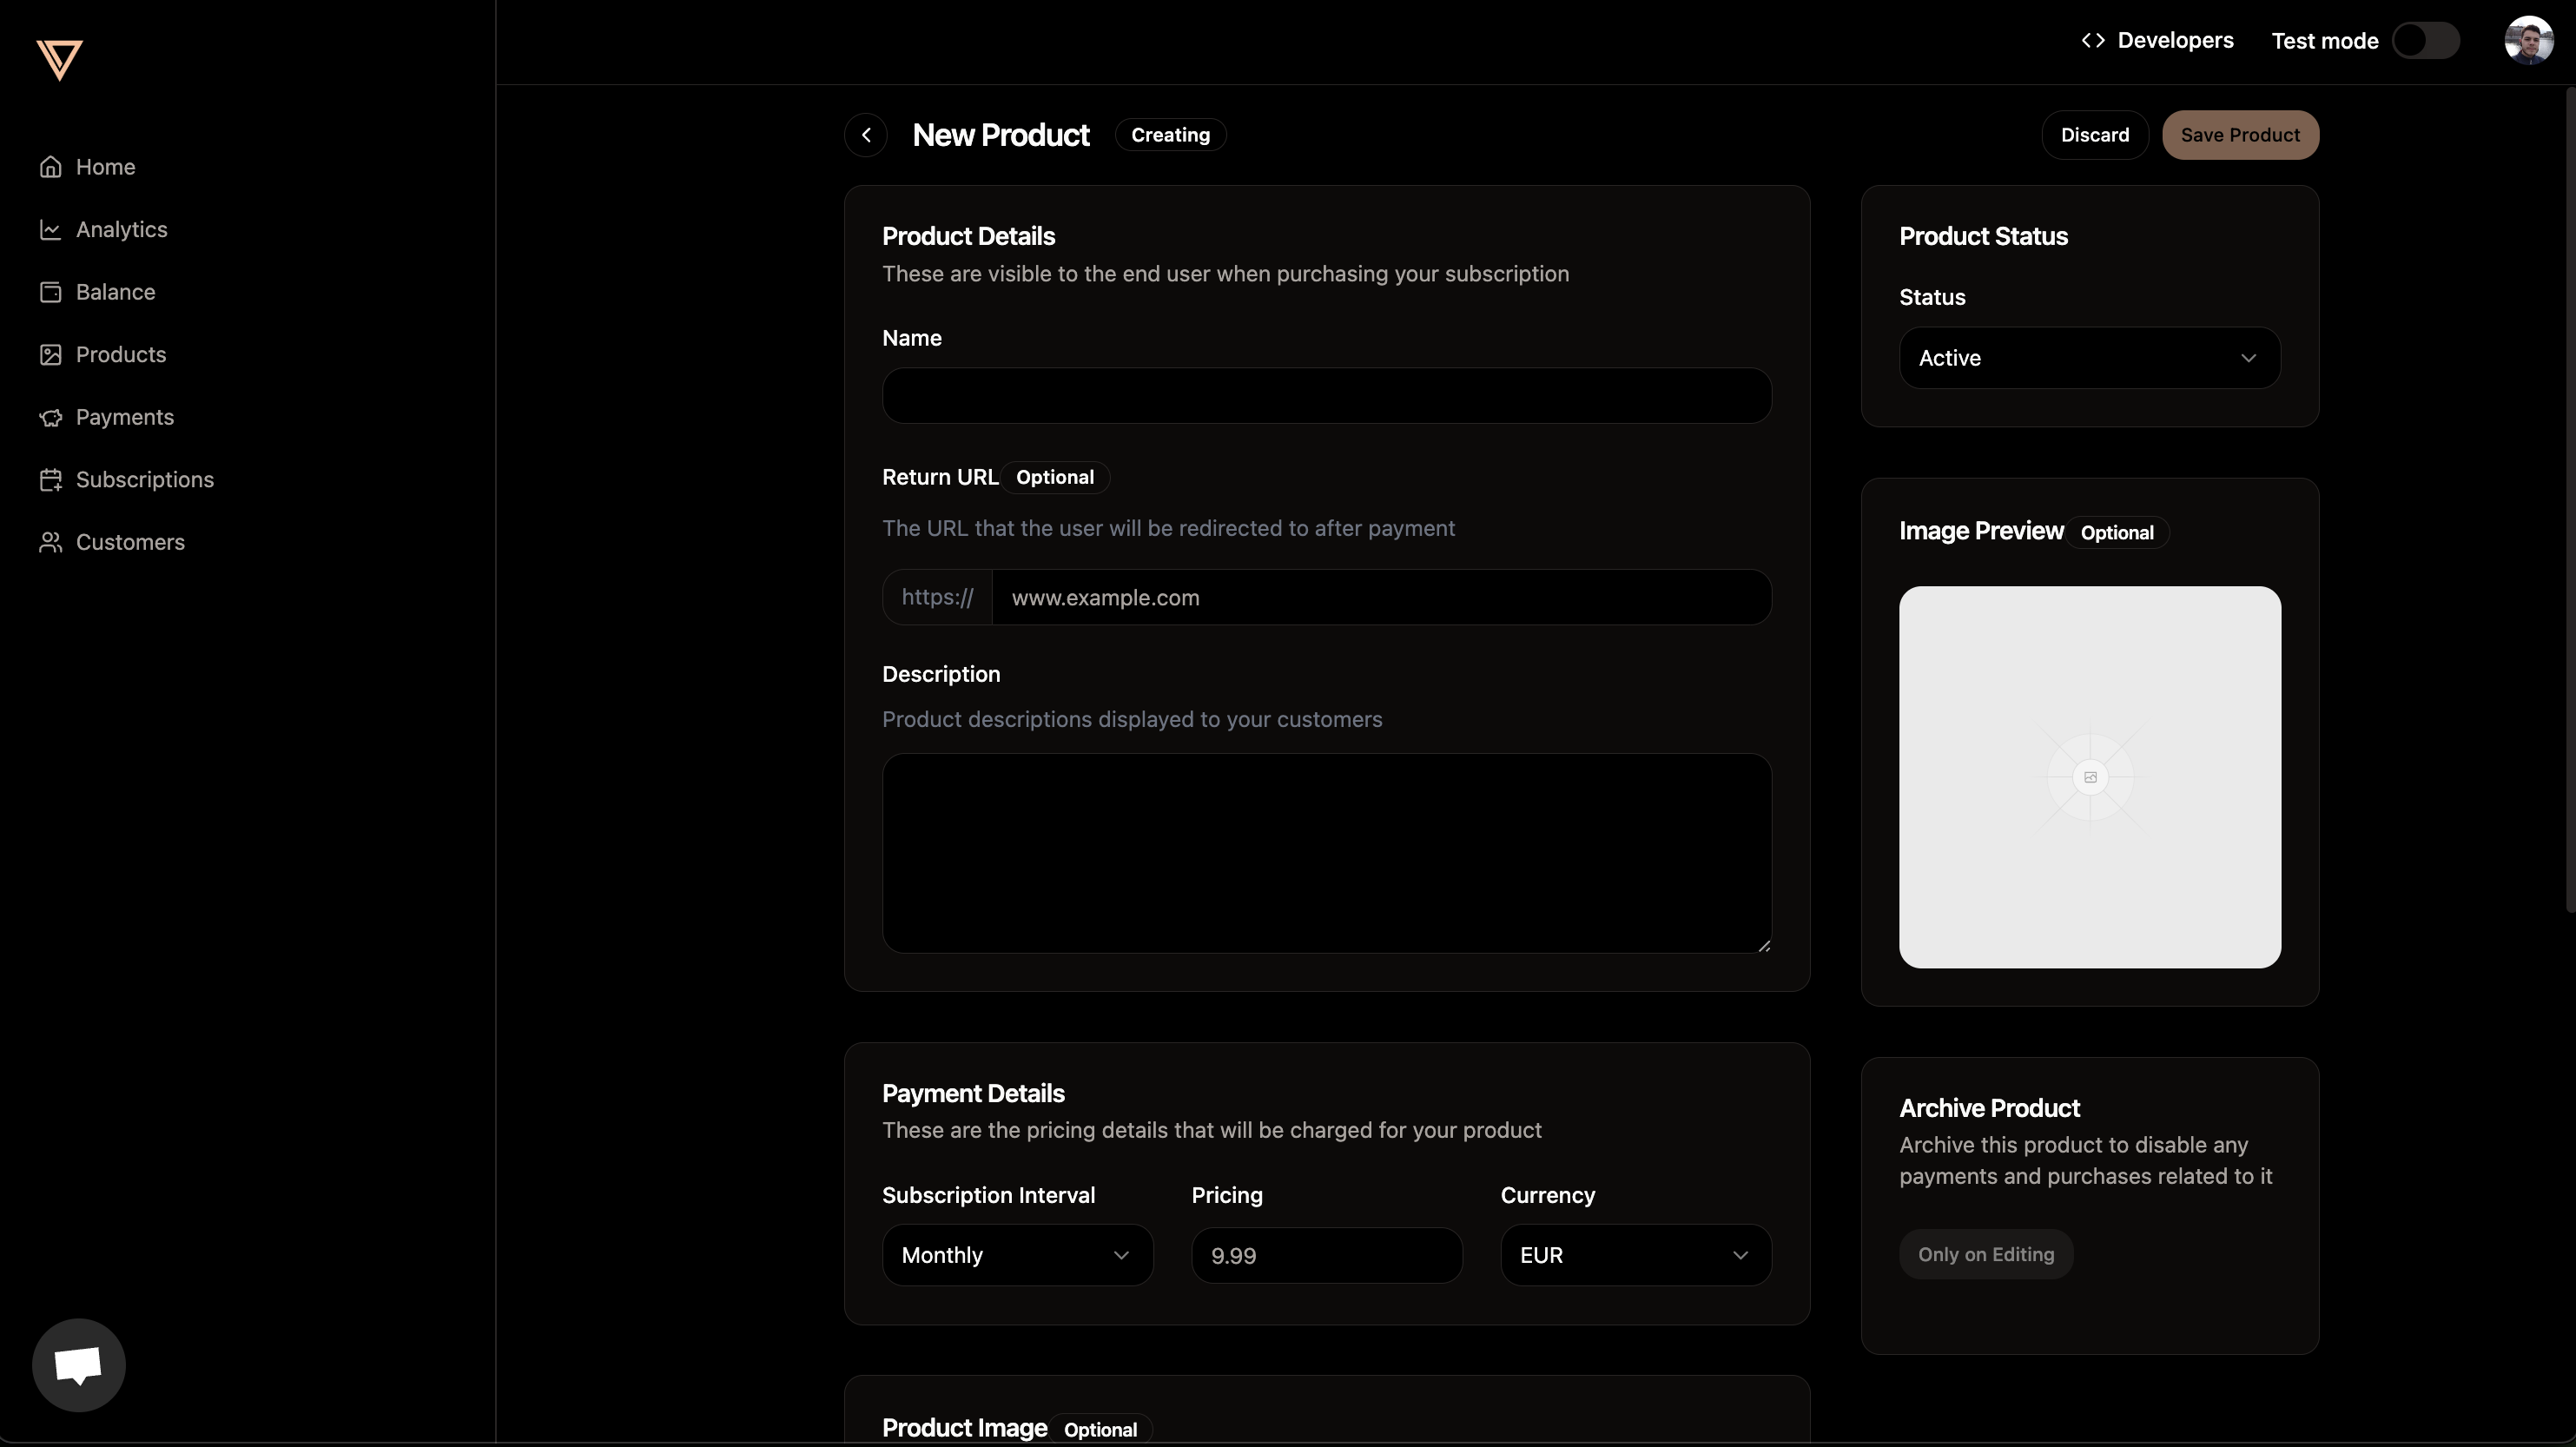
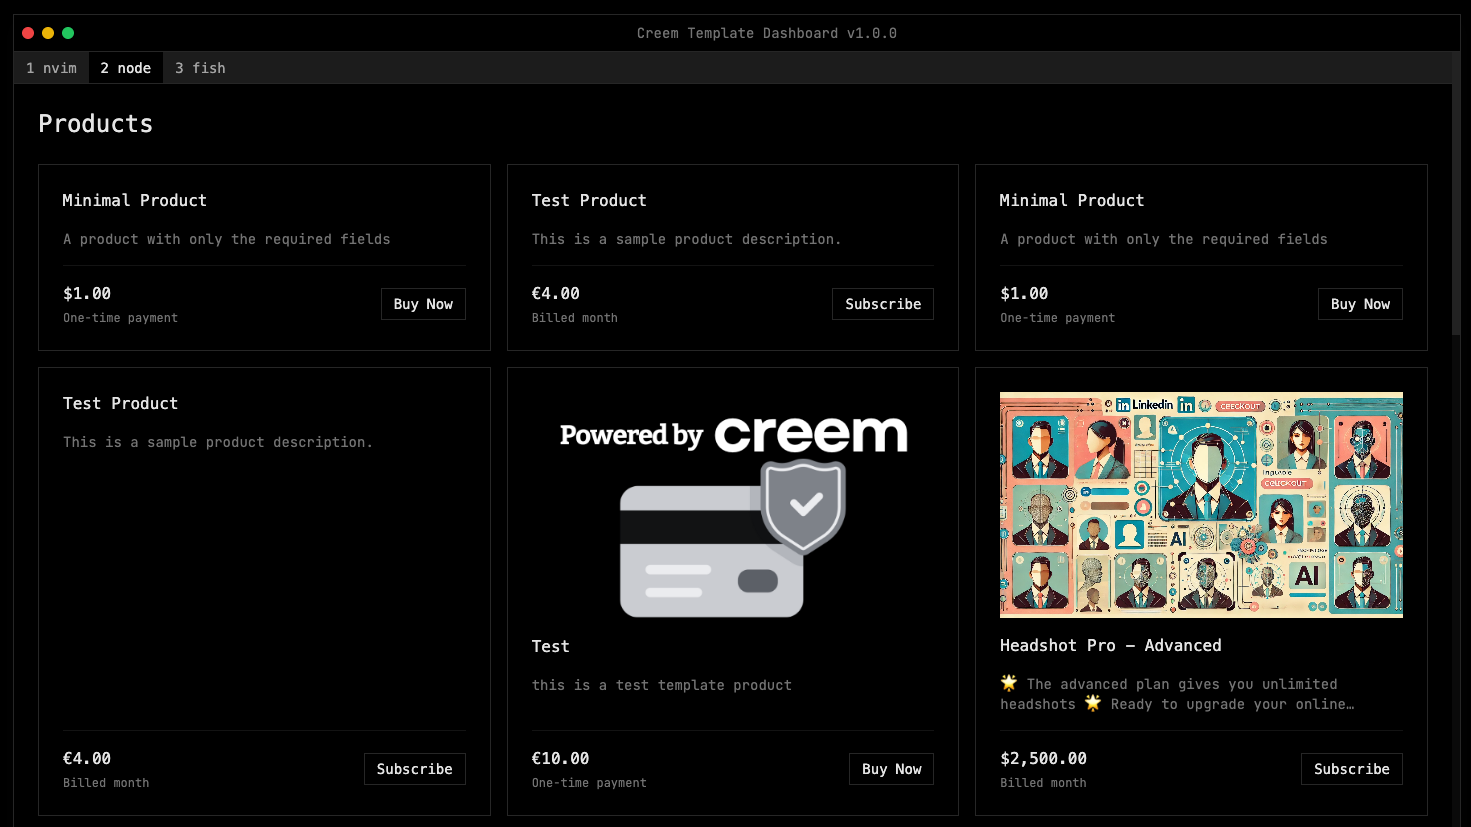
## 1. Create a product
Go over to the [products tab](https://creem.io/dashboard/products) and create a product.
You can add a name, description, and price to your product. Optionally you can also add a picture to your product that will be shown to users.
# Activate License Key
Source: https://docs.creem.io/api-reference/endpoint/activate-license
post /v1/licenses/activate
# Cancel Subscription
Source: https://docs.creem.io/api-reference/endpoint/cancel-subscription
post /v1/subscriptions/{id}/cancel
# Create Checkout Session
Source: https://docs.creem.io/api-reference/endpoint/create-checkout
post /v1/checkouts
# Create Discount Code
Source: https://docs.creem.io/api-reference/endpoint/create-discount-code
post /v1/discounts
# Create Product
Source: https://docs.creem.io/api-reference/endpoint/create-product
post /v1/products
# Deactivate License Key
Source: https://docs.creem.io/api-reference/endpoint/deactivate-license
post /v1/licenses/deactivate
# Delete Discount Code
Source: https://docs.creem.io/api-reference/endpoint/delete-discount-code
delete /v1/discounts/{id}/delete
# Get Checkout Session
Source: https://docs.creem.io/api-reference/endpoint/get-checkout
get /v1/checkouts
# Get Customer
Source: https://docs.creem.io/api-reference/endpoint/get-customer
get /v1/customers
# Get Discount Code
Source: https://docs.creem.io/api-reference/endpoint/get-discount-code
get /v1/discounts
# Get Product
Source: https://docs.creem.io/api-reference/endpoint/get-product
get /v1/products
# Get Subscription
Source: https://docs.creem.io/api-reference/endpoint/get-subscription
get /v1/subscriptions
# List Transactions
Source: https://docs.creem.io/api-reference/endpoint/get-transactions
get /v1/transactions/search
# List Products
Source: https://docs.creem.io/api-reference/endpoint/search-products
get /v1/products/search
# Update Subscription
Source: https://docs.creem.io/api-reference/endpoint/update-subscription
post /v1/subscriptions/{id}
# Upgrade Subscription
Source: https://docs.creem.io/api-reference/endpoint/upgrade-subscription
post /v1/subscriptions/{id}/upgrade
# Validate License Key
Source: https://docs.creem.io/api-reference/endpoint/validate-license
post /v1/licenses/validate
# Introduction
Source: https://docs.creem.io/api-reference/introduction
Understand general concepts, response codes, and authentication strategies.
## Base URL
The Creem API is built on REST principles. We enforce HTTPS in every request to improve data security, integrity, and privacy. The API does not support HTTP.
All requests contain the following base URL:
```http
https://api.creem.io
```
## Authentication
To authenticate you need to add an `x-api-key` header with the contents of the header being your API Key.
All API endpoints are authenticated using Api Keys and picked up from the specification file.
```json
{
"headers": {
"x-api-key": "creem_123456789"
}
}
```
## Response codes
Creem uses standard HTTP codes to indicate the success or failure of your requests.
In general, 2xx HTTP codes correspond to success, 4xx codes are for user-related failures, and 5xx codes are for infrastructure issues.
| Status | Description |
| ------ | --------------------------------------- |
| 200 | Successful request. |
| 400 | Check that the parameters were correct. |
| 401 | The API key used was missing. |
| 403 | The API key used was invalid. |
| 404 | The resource was not found. |
| 429 | The rate limit was exceeded. |
| 500 | Indicates an error with Creem servers. |
# Standard Integration
Source: https://docs.creem.io/checkout-flow
Learn how to receive payments on your application
## Prerequisites
To get the most out of this guide, you'll need to:
* **Create an account on Creem.io**
* **Have your API key ready**
## 1. Create a product
Go over to the [products tab](https://creem.io/dashboard/products) and create a product.
You can add a name, description, and price to your product. Optionally you can also add a picture to your product that will be shown to users.
 ## Getting Started
Setting up file downloads for your product is straightforward and requires minimal configuration:
1. Navigate to Your Product Settings
* Log into your Creem Dashboard
* Go to "Products" section
* Create a new product
* Enable "File Downloads" feature
2. Configure Your File Download
* Upload your digital file(s)
* Save your configuration
## How It Works
Once configured, the file download system works automatically. When a customer completes a purchase, they'll receive access to your files in multiple locations:
* **Email Receipt:** A secure download link appears in the purchase confirmation email that will lead the user to the customer portal
## Getting Started
Setting up file downloads for your product is straightforward and requires minimal configuration:
1. Navigate to Your Product Settings
* Log into your Creem Dashboard
* Go to "Products" section
* Create a new product
* Enable "File Downloads" feature
2. Configure Your File Download
* Upload your digital file(s)
* Save your configuration
## How It Works
Once configured, the file download system works automatically. When a customer completes a purchase, they'll receive access to your files in multiple locations:
* **Email Receipt:** A secure download link appears in the purchase confirmation email that will lead the user to the customer portal
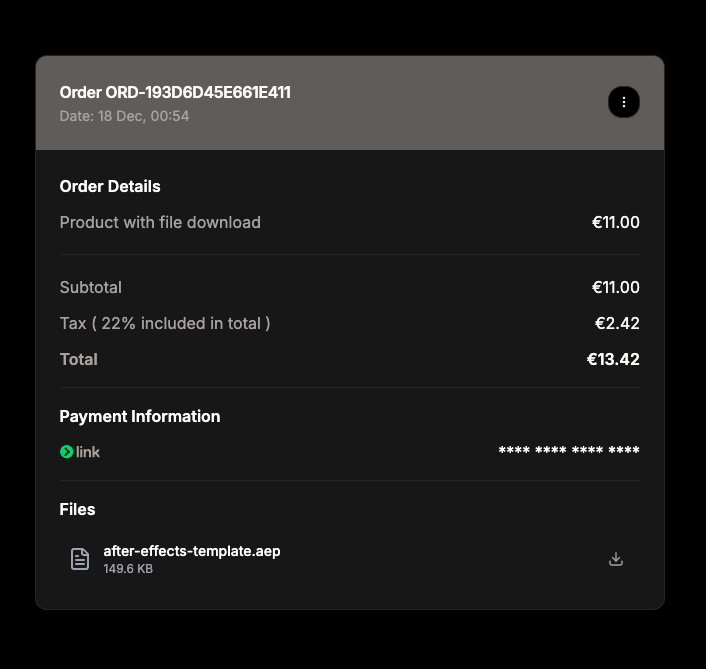
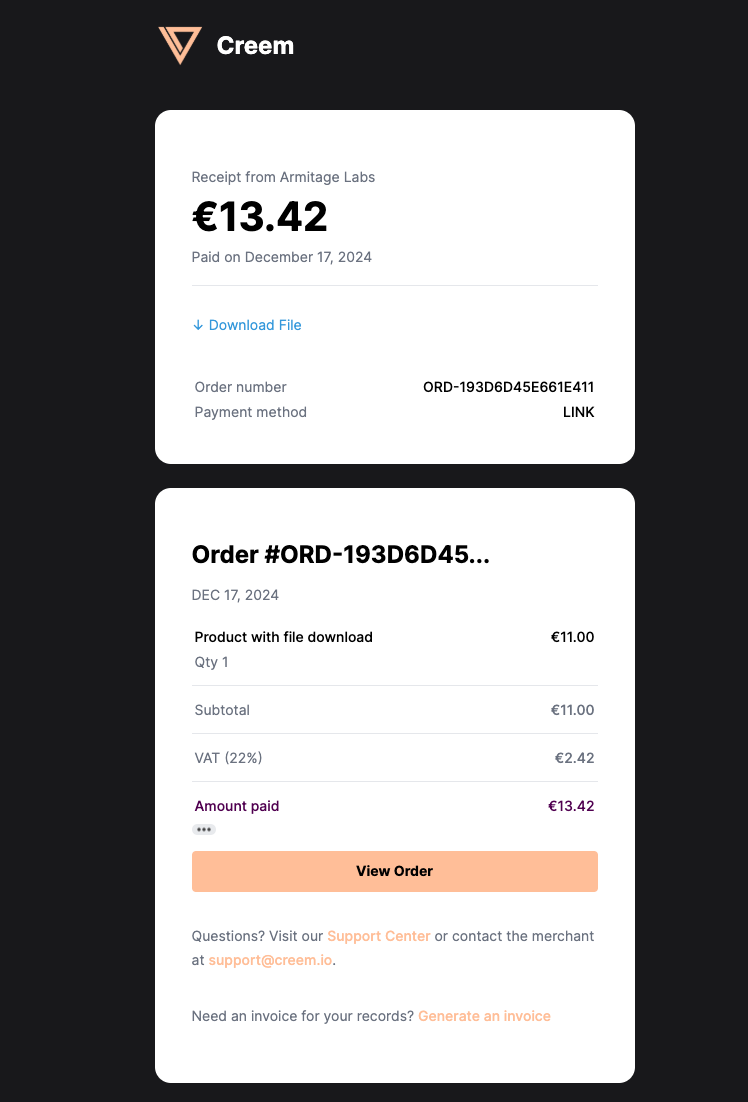 * **Customer Portal:** Customers can download files anytime through their portal
 ## Best Practices
* Organize files with clear, descriptive names
* Compress large files when possible
* Include readme files for installation or usage instructions
* Regularly verify file integrity
**Pro Tips**
* Consider providing multiple file formats when relevant
* Include version numbers in file names if applicable
## Common Use Cases
* **Digital Products:** eBooks, music, videos, or software
* **Documentation:** User manuals, guides, or specifications
* **Resources:** Templates, assets, or tools
* **Educational Content:** Course materials or supplementary resources
## Security Features
Creem's file download system implements several security measures:
* Secure, expiring download links
* Protected file storage
* Download attempt monitoring
* Automated abuse prevention
**Need Help?**
Our support team is ready to assist you with setting up file downloads. Contact us at [support@creem.co](mailto:support@creem.co)
# Introduction
Source: https://docs.creem.io/features/introduction
Understand what are, and how to use product features.
Welcome to Creem's Product Features documentation! This guide will help you understand what product features are and how to effectively implement them in your products.
## What are product features?
Product features are powerful add-ons that enhance your product's functionality and value proposition. They are specialized components that can be attached to any product, providing additional benefits to your customers during or after their purchase.
## Available Features
Creem offers several powerful features that you can integrate into your products seamlessly:
* **License Keys:** Implement secure software licensing with automated key generation and validation
* **Private Notes:** Share important information automatically with customers post-purchase
* **Custom Fields:** Collect additional information from customers during checkout
* **File Downloads:** Securely distribute digital files and manage download access for customers
## Best Practices
* Only enable features that add value to your specific product
* Configure features before making your product live
* Test the customer experience thoroughly
* Keep documentation updated with feature changes
## Best Practices
* Organize files with clear, descriptive names
* Compress large files when possible
* Include readme files for installation or usage instructions
* Regularly verify file integrity
**Pro Tips**
* Consider providing multiple file formats when relevant
* Include version numbers in file names if applicable
## Common Use Cases
* **Digital Products:** eBooks, music, videos, or software
* **Documentation:** User manuals, guides, or specifications
* **Resources:** Templates, assets, or tools
* **Educational Content:** Course materials or supplementary resources
## Security Features
Creem's file download system implements several security measures:
* Secure, expiring download links
* Protected file storage
* Download attempt monitoring
* Automated abuse prevention
**Need Help?**
Our support team is ready to assist you with setting up file downloads. Contact us at [support@creem.co](mailto:support@creem.co)
# Introduction
Source: https://docs.creem.io/features/introduction
Understand what are, and how to use product features.
Welcome to Creem's Product Features documentation! This guide will help you understand what product features are and how to effectively implement them in your products.
## What are product features?
Product features are powerful add-ons that enhance your product's functionality and value proposition. They are specialized components that can be attached to any product, providing additional benefits to your customers during or after their purchase.
## Available Features
Creem offers several powerful features that you can integrate into your products seamlessly:
* **License Keys:** Implement secure software licensing with automated key generation and validation
* **Private Notes:** Share important information automatically with customers post-purchase
* **Custom Fields:** Collect additional information from customers during checkout
* **File Downloads:** Securely distribute digital files and manage download access for customers
## Best Practices
* Only enable features that add value to your specific product
* Configure features before making your product live
* Test the customer experience thoroughly
* Keep documentation updated with feature changes
 # License Key Management with Creem
Welcome to Creem's License Key documentation! As a Merchant of Record specializing in Micro-SaaS and AI Businesses, we've built a powerful license key system that's both flexible and secure.
## Getting Started
Setting up license keys for your product is straightforward:
1. Configuring
* Create a new product with a License key feature enabled
* Configure settings related to the licenses
* Set up your product integration or payment links for customer purchases
2. Dealing wiht a license after purchases
* Enable the user to enter a license key in your application
* Activate a license key instance
* Validate a license key instance on subsequent usages
## Step-by-Step Tutorial: Implementing License Keys
Let's walk through the complete process of implementing license keys in your application. We'll cover everything from initial setup to handling customer interactions.
### Step 1: Creating Your Product
First, let's set up your product in the Creem dashboard:
1. **Navigate to Products:** Log into your Creem dashboard and click "Create New Product"
2. **Enable License Keys:** In the product settings, enable the "License Key Management" feature
3. **Configure License Settings:**
* Set activation limits (e.g., 3 devices per license)
* Define expiration periods (e.g., 1 year from purchase)
# License Key Management with Creem
Welcome to Creem's License Key documentation! As a Merchant of Record specializing in Micro-SaaS and AI Businesses, we've built a powerful license key system that's both flexible and secure.
## Getting Started
Setting up license keys for your product is straightforward:
1. Configuring
* Create a new product with a License key feature enabled
* Configure settings related to the licenses
* Set up your product integration or payment links for customer purchases
2. Dealing wiht a license after purchases
* Enable the user to enter a license key in your application
* Activate a license key instance
* Validate a license key instance on subsequent usages
## Step-by-Step Tutorial: Implementing License Keys
Let's walk through the complete process of implementing license keys in your application. We'll cover everything from initial setup to handling customer interactions.
### Step 1: Creating Your Product
First, let's set up your product in the Creem dashboard:
1. **Navigate to Products:** Log into your Creem dashboard and click "Create New Product"
2. **Enable License Keys:** In the product settings, enable the "License Key Management" feature
3. **Configure License Settings:**
* Set activation limits (e.g., 3 devices per license)
* Define expiration periods (e.g., 1 year from purchase)
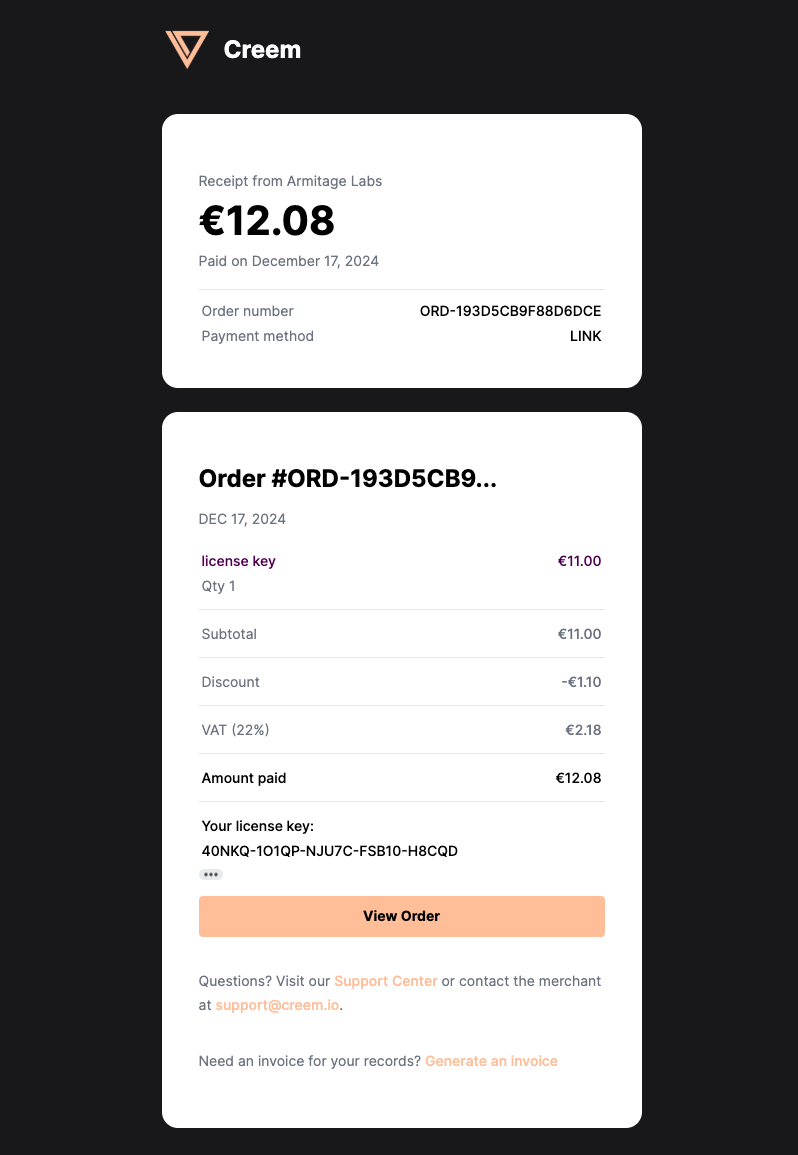
 ### Step 2: Customer Purchase Flow
When a customer purchases your product, here's what happens automatically:
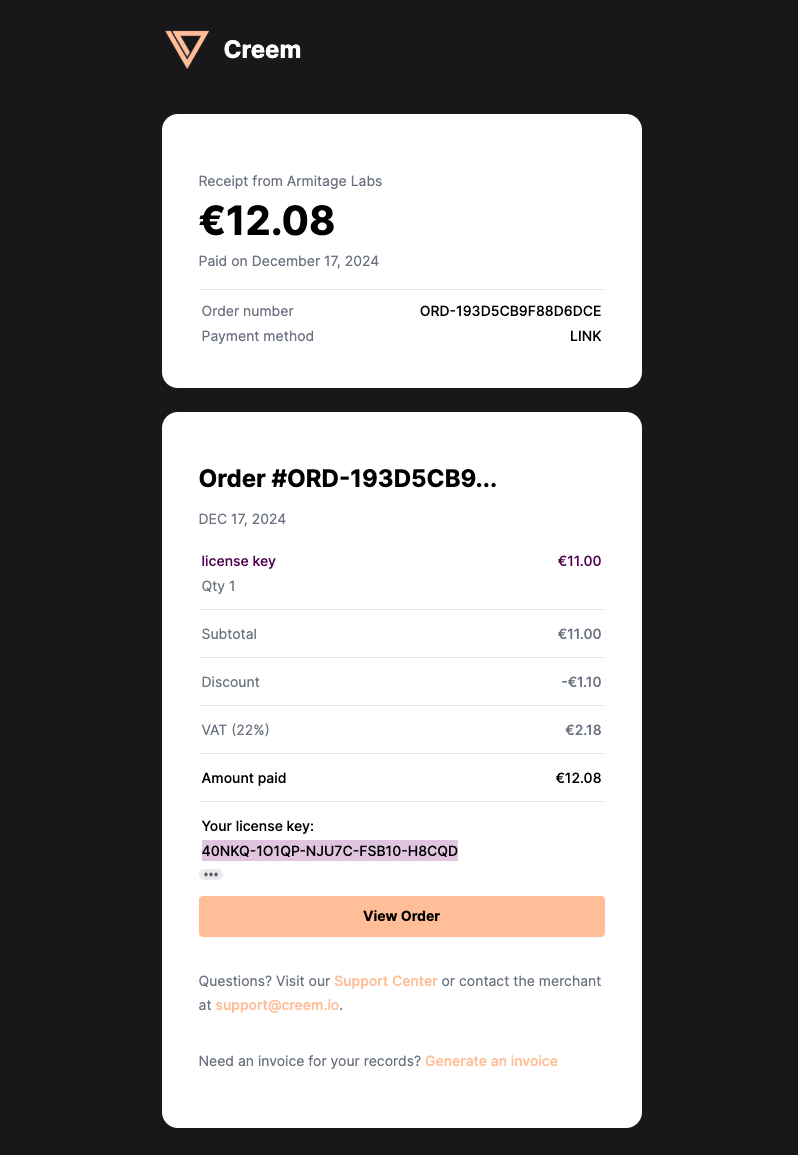
* A unique license key is generated and associated with their purchase
* The key appears in their order confirmation page
* It's included in their email receipt
* The key is accessible in their customer portal
### Step 2: Customer Purchase Flow
When a customer purchases your product, here's what happens automatically:
* A unique license key is generated and associated with their purchase
* The key appears in their order confirmation page
* It's included in their email receipt
* The key is accessible in their customer portal
 ### Step 3: Implementing License Key Activation
Now comes the exciting part - implementing the license key system in your application!
1. Create a License Key Input form or input field where users can enter their license key. This could be during:
* Initial app setup
* First launch
* Account creation
* Premium feature access
2. Implement the Activation Endpoint
```jsx
const activateLicense = async (licenseKey, instanceName) => {
const response = await fetch('https://test-api.creem.io/v1/licenses/activate', {
method: 'POST',
headers: {
'accept': 'application/json',
'x-api-key': 'YOUR_API_KEY',
'Content-Type': 'application/json'
},
body: JSON.stringify({
key: licenseKey,
instance_name: instanceName
})
});
return await response.json();
}
```
### Step 3: Implementing License Key Activation
Now comes the exciting part - implementing the license key system in your application!
1. Create a License Key Input form or input field where users can enter their license key. This could be during:
* Initial app setup
* First launch
* Account creation
* Premium feature access
2. Implement the Activation Endpoint
```jsx
const activateLicense = async (licenseKey, instanceName) => {
const response = await fetch('https://test-api.creem.io/v1/licenses/activate', {
method: 'POST',
headers: {
'accept': 'application/json',
'x-api-key': 'YOUR_API_KEY',
'Content-Type': 'application/json'
},
body: JSON.stringify({
key: licenseKey,
instance_name: instanceName
})
});
return await response.json();
}
```
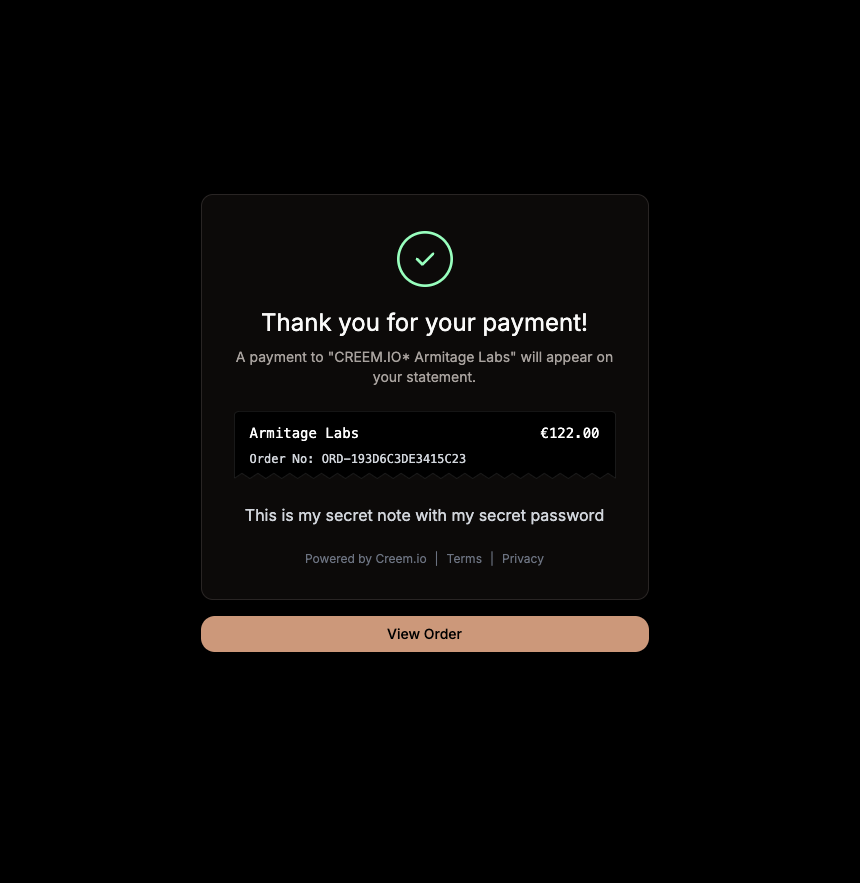
 2. Configure Your Private Note
* Enter the note content that customers will receive
* Save your configuration
## How It Works
Once configured, the private note system works automatically. When a customer completes a purchase, they'll receive your private note in multiple locations:
* **Email Receipt:** The private note appears in the purchase confirmation email
2. Configure Your Private Note
* Enter the note content that customers will receive
* Save your configuration
## How It Works
Once configured, the private note system works automatically. When a customer completes a purchase, they'll receive your private note in multiple locations:
* **Email Receipt:** The private note appears in the purchase confirmation email
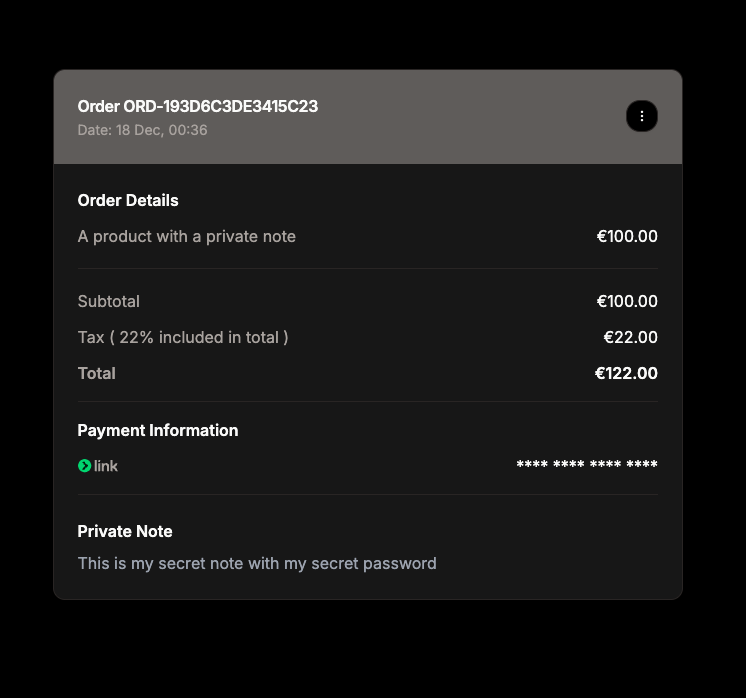 * **Customer Portal:** Customers can access the note anytime through their portal
* **Order Confirmation Page:** The note is displayed immediately after purchase (when no redirect URL is set)
* **Customer Portal:** Customers can access the note anytime through their portal
* **Order Confirmation Page:** The note is displayed immediately after purchase (when no redirect URL is set)
 ## Best Practices
* Keep notes clear and concise
* Include relevant information for post-purchase actions
* Consider adding support contact information
* Use different notes as needed for different product versions
**Pro Tips**
* Use formatting to highlight important information
* Include next steps if applicable
* Consider different customer scenarios when writing your note
## Common Use Cases
* **Service Purchases:** Share onboarding information or next steps
* **Course Access:** Provide login credentials or access instructions
* **Digital Content:** Password to spreadsheets
* **Premium Customer Support:** Contact numbers, emails or other channels
# Merchant of Record
Source: https://docs.creem.io/finance/merchant-of-record
A quick overview of the Merchant of Record framework.
## Overview
A merchant of record (sometimes shortened to “MoR”) is a legal entity that takes on the responsibility of selling goods and services to end customers, handling everything from payments to compliance.
## What is a Merchant of Record?
A Merchant of Record (MoR) is the legal entity responsible for selling goods or services to end customers. When customers make a purchase through Creem, they are technically buying from us as the Merchant of Record. This means we handle all aspects of the transaction, including payment processing, sales tax collection, refund management, chargeback handling, etc.
## Is Creem a Merchant of Record?
## Best Practices
* Keep notes clear and concise
* Include relevant information for post-purchase actions
* Consider adding support contact information
* Use different notes as needed for different product versions
**Pro Tips**
* Use formatting to highlight important information
* Include next steps if applicable
* Consider different customer scenarios when writing your note
## Common Use Cases
* **Service Purchases:** Share onboarding information or next steps
* **Course Access:** Provide login credentials or access instructions
* **Digital Content:** Password to spreadsheets
* **Premium Customer Support:** Contact numbers, emails or other channels
# Merchant of Record
Source: https://docs.creem.io/finance/merchant-of-record
A quick overview of the Merchant of Record framework.
## Overview
A merchant of record (sometimes shortened to “MoR”) is a legal entity that takes on the responsibility of selling goods and services to end customers, handling everything from payments to compliance.
## What is a Merchant of Record?
A Merchant of Record (MoR) is the legal entity responsible for selling goods or services to end customers. When customers make a purchase through Creem, they are technically buying from us as the Merchant of Record. This means we handle all aspects of the transaction, including payment processing, sales tax collection, refund management, chargeback handling, etc.
## Is Creem a Merchant of Record?
 ## Overview
Welcome to the integration guide for Creem and Affonso! This partnership enables automated affiliate program management with seamless payment processing.
## Overview
Welcome to the integration guide for Creem and Affonso! This partnership enables automated affiliate program management with seamless payment processing.
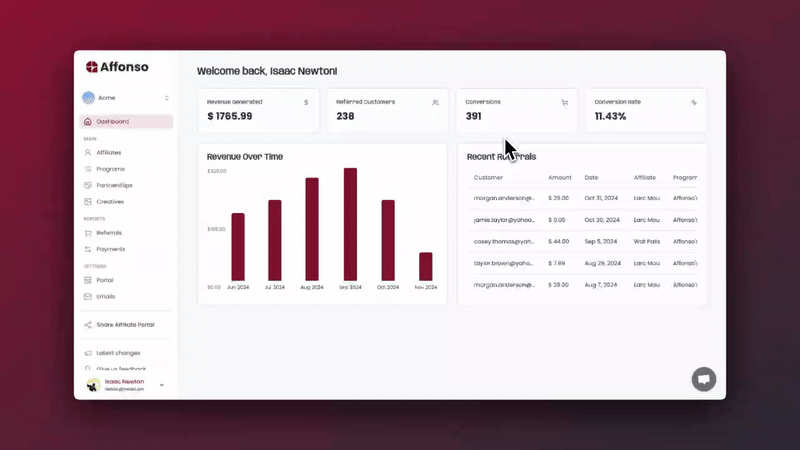 This integration allows you to leverage Affonso's affiliate tracking and management alongside Creem's robust payment processing. Your affiliates can be automatically tracked, and their commissions paid separately from your business financials.
 ### 1. Installing the Creem plugin
 ## Overview
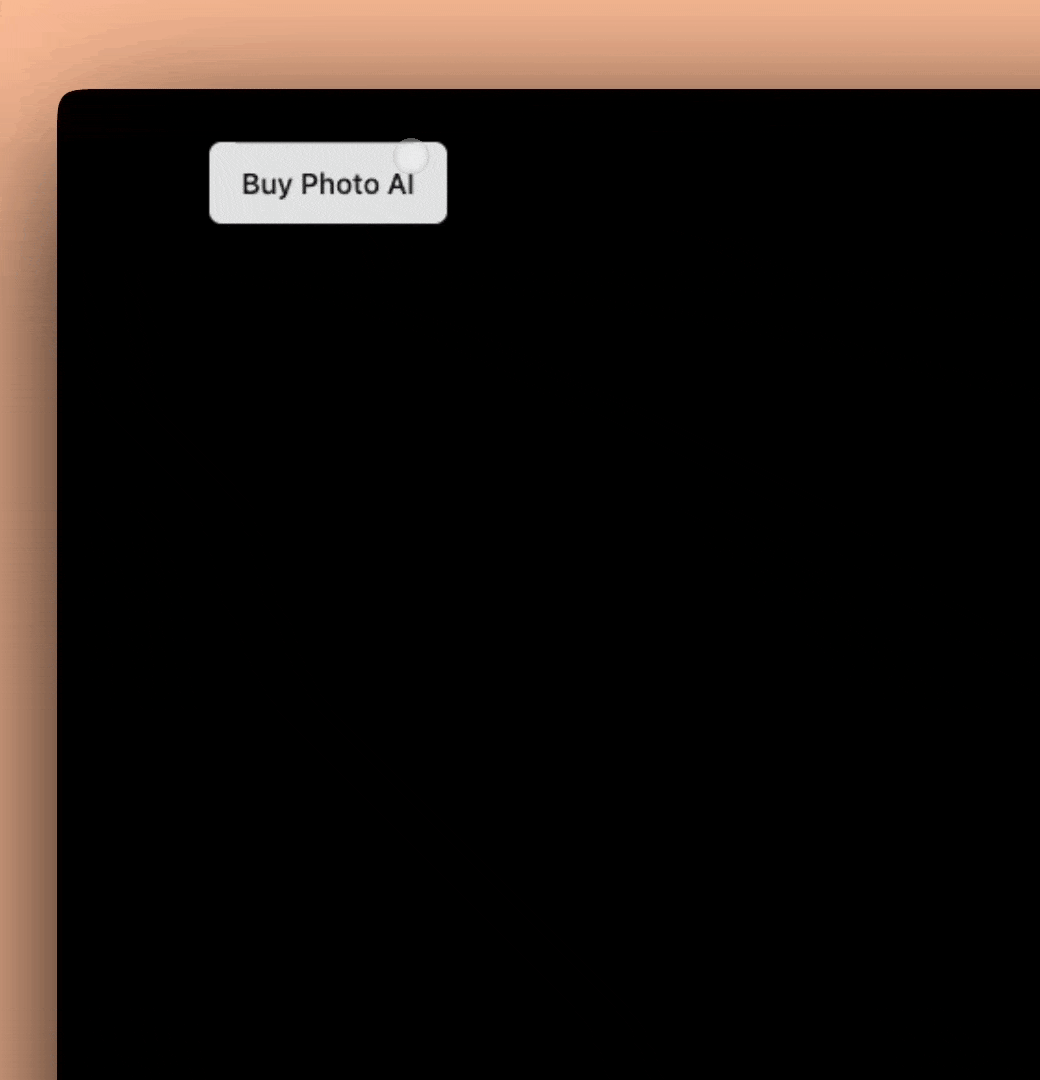
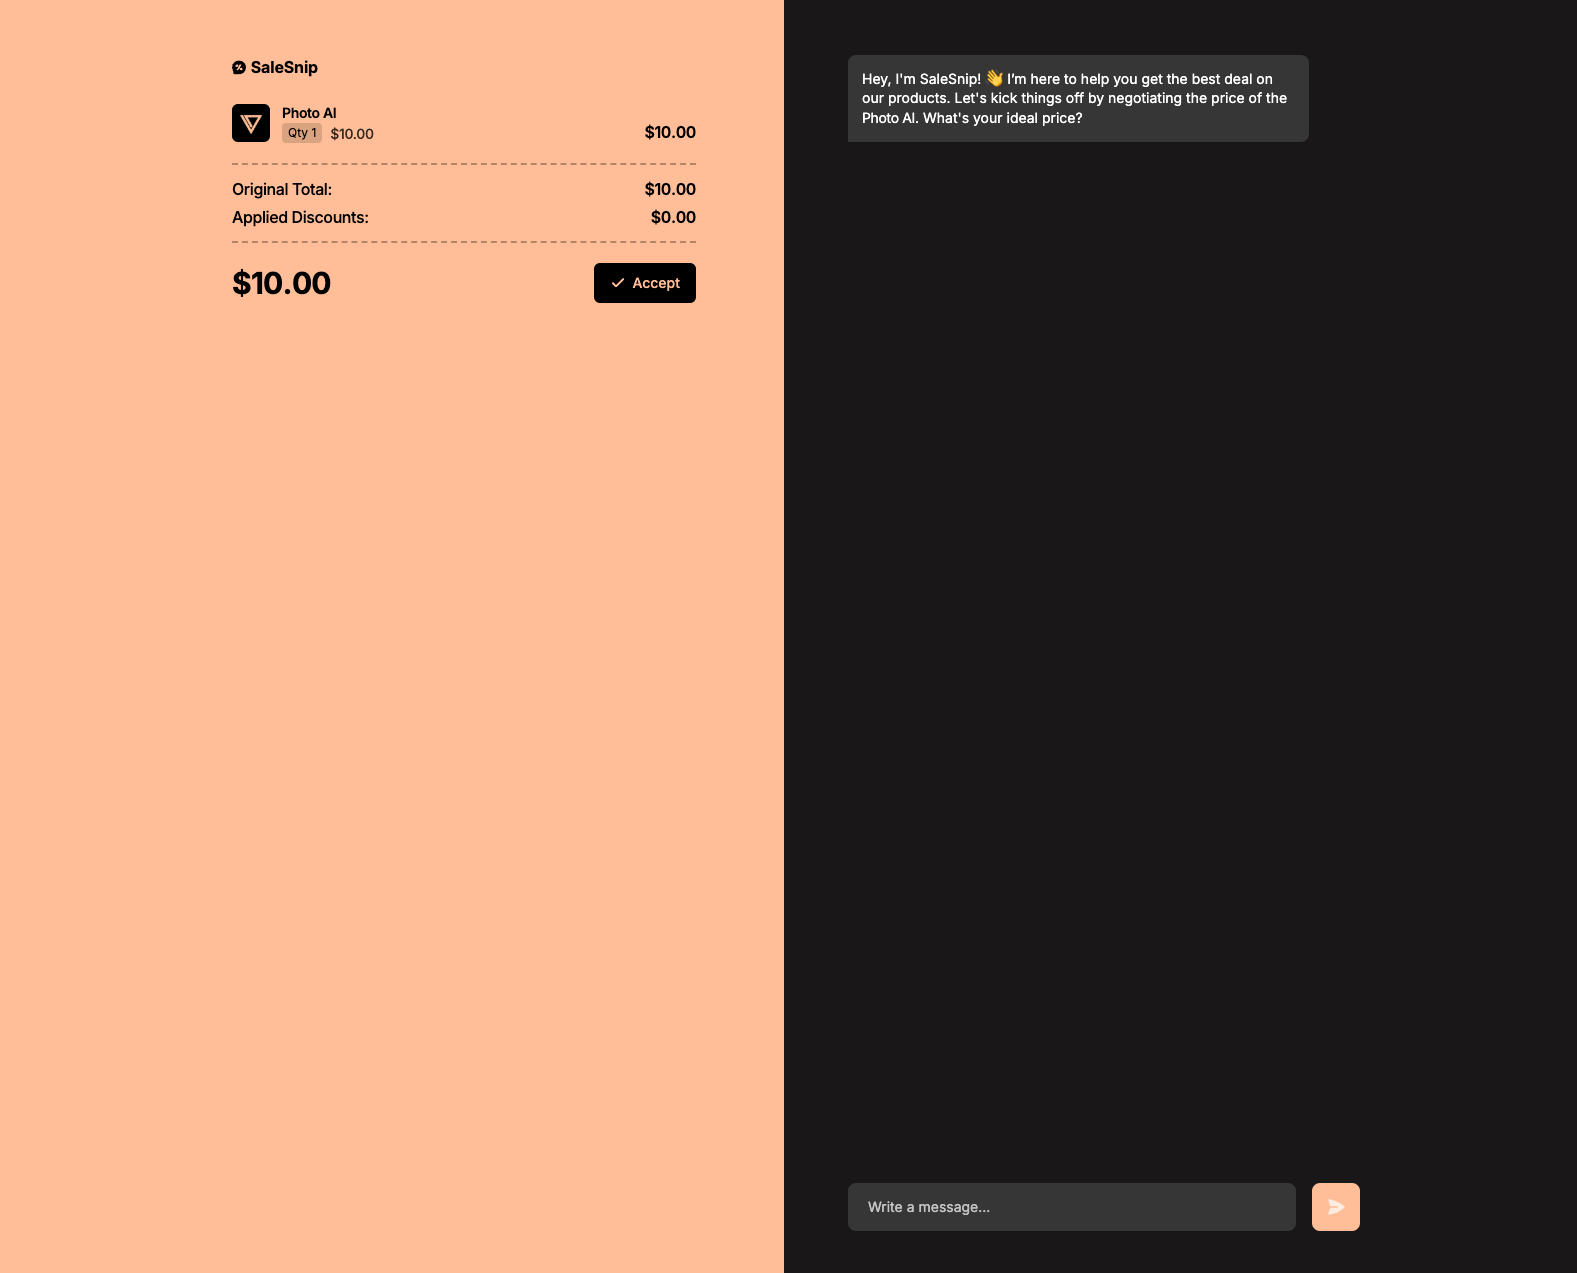
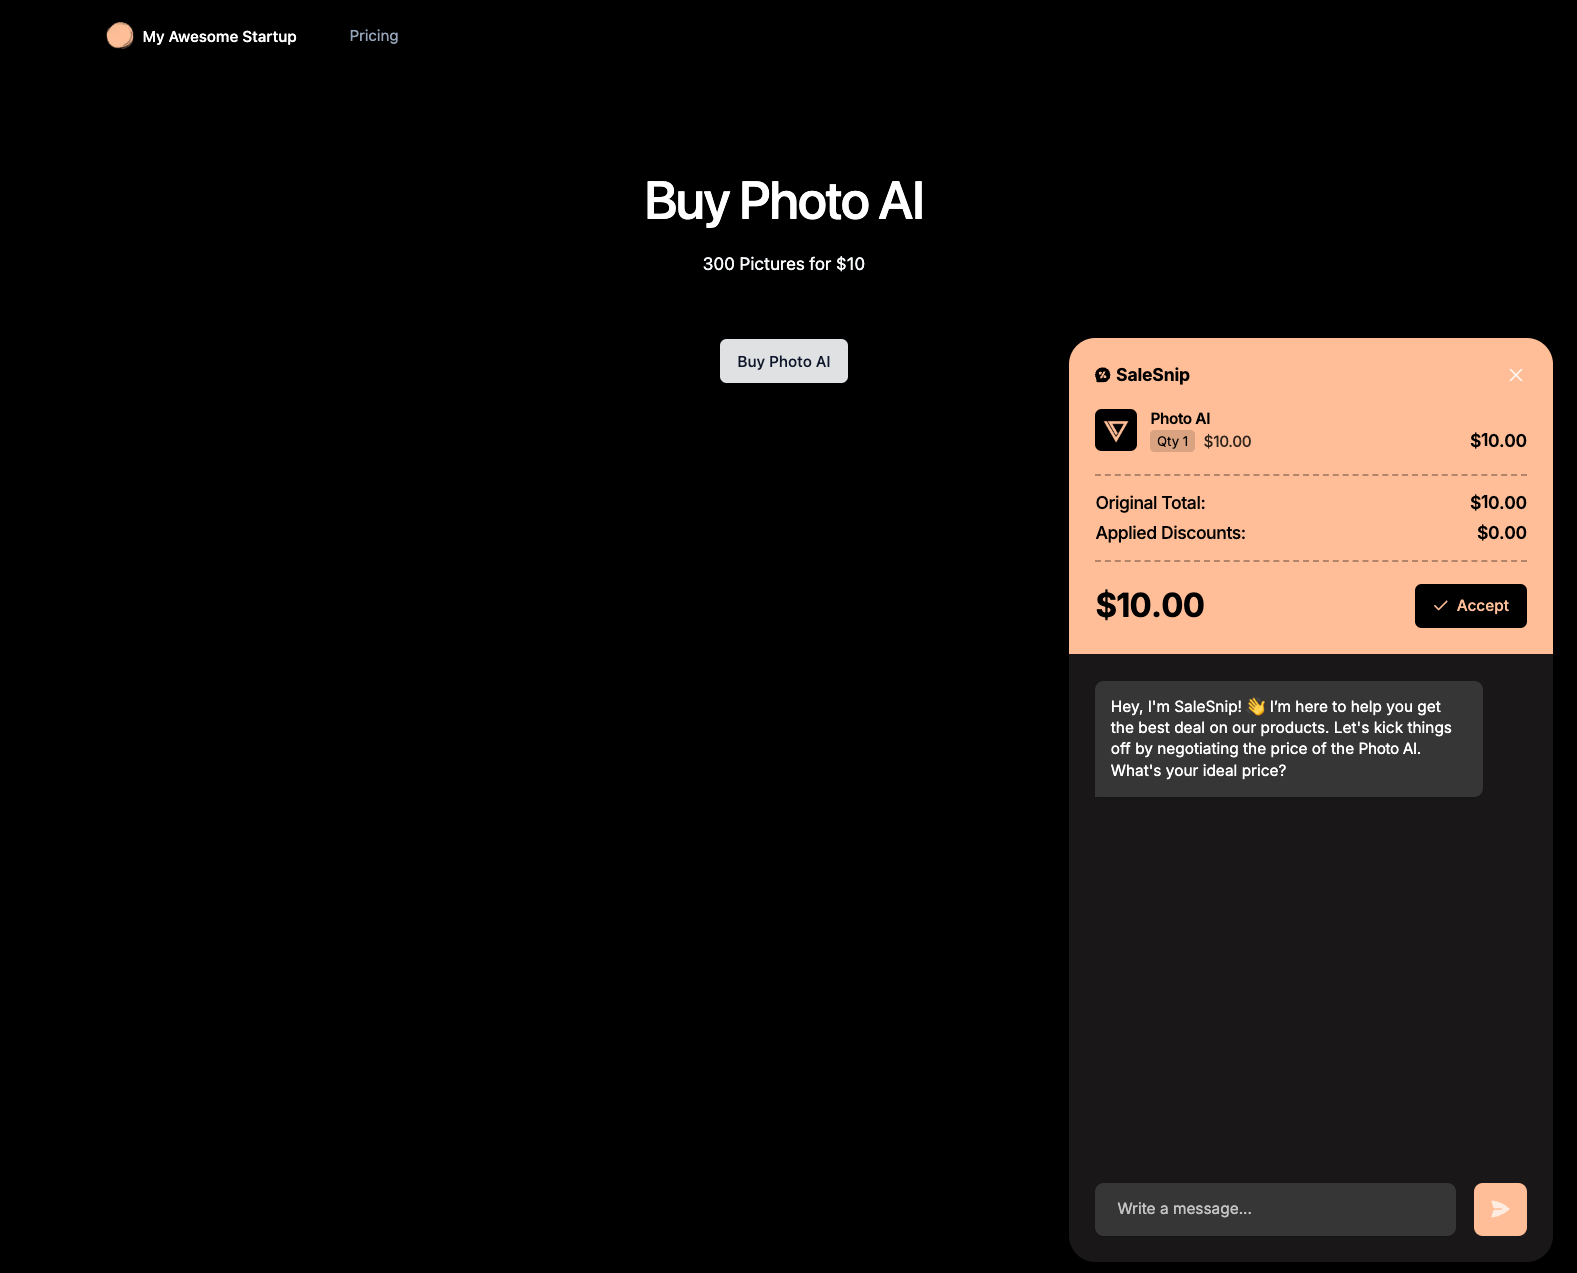
We are proud to partner with SaleSnip on the cutting edge of AI and payments.
## Overview
We are proud to partner with SaleSnip on the cutting edge of AI and payments.
 This integration allows you to leverage Salesnip's advanced AI negotiation bot alongside Creem's robust payment processing. Your customers can negotiate prices automatically, and upon agreement, seamlessly complete their purchase through Creem's secure checkout.
 */}
## Quickstart
The first step to start using Creem is to create an account and get your API key.
After that, feel free to explore our API reference for more details. Or to jump start into our straightforward tutorial.
*/}
## Quickstart
The first step to start using Creem is to create an account and get your API key.
After that, feel free to explore our API reference for more details. Or to jump start into our straightforward tutorial.
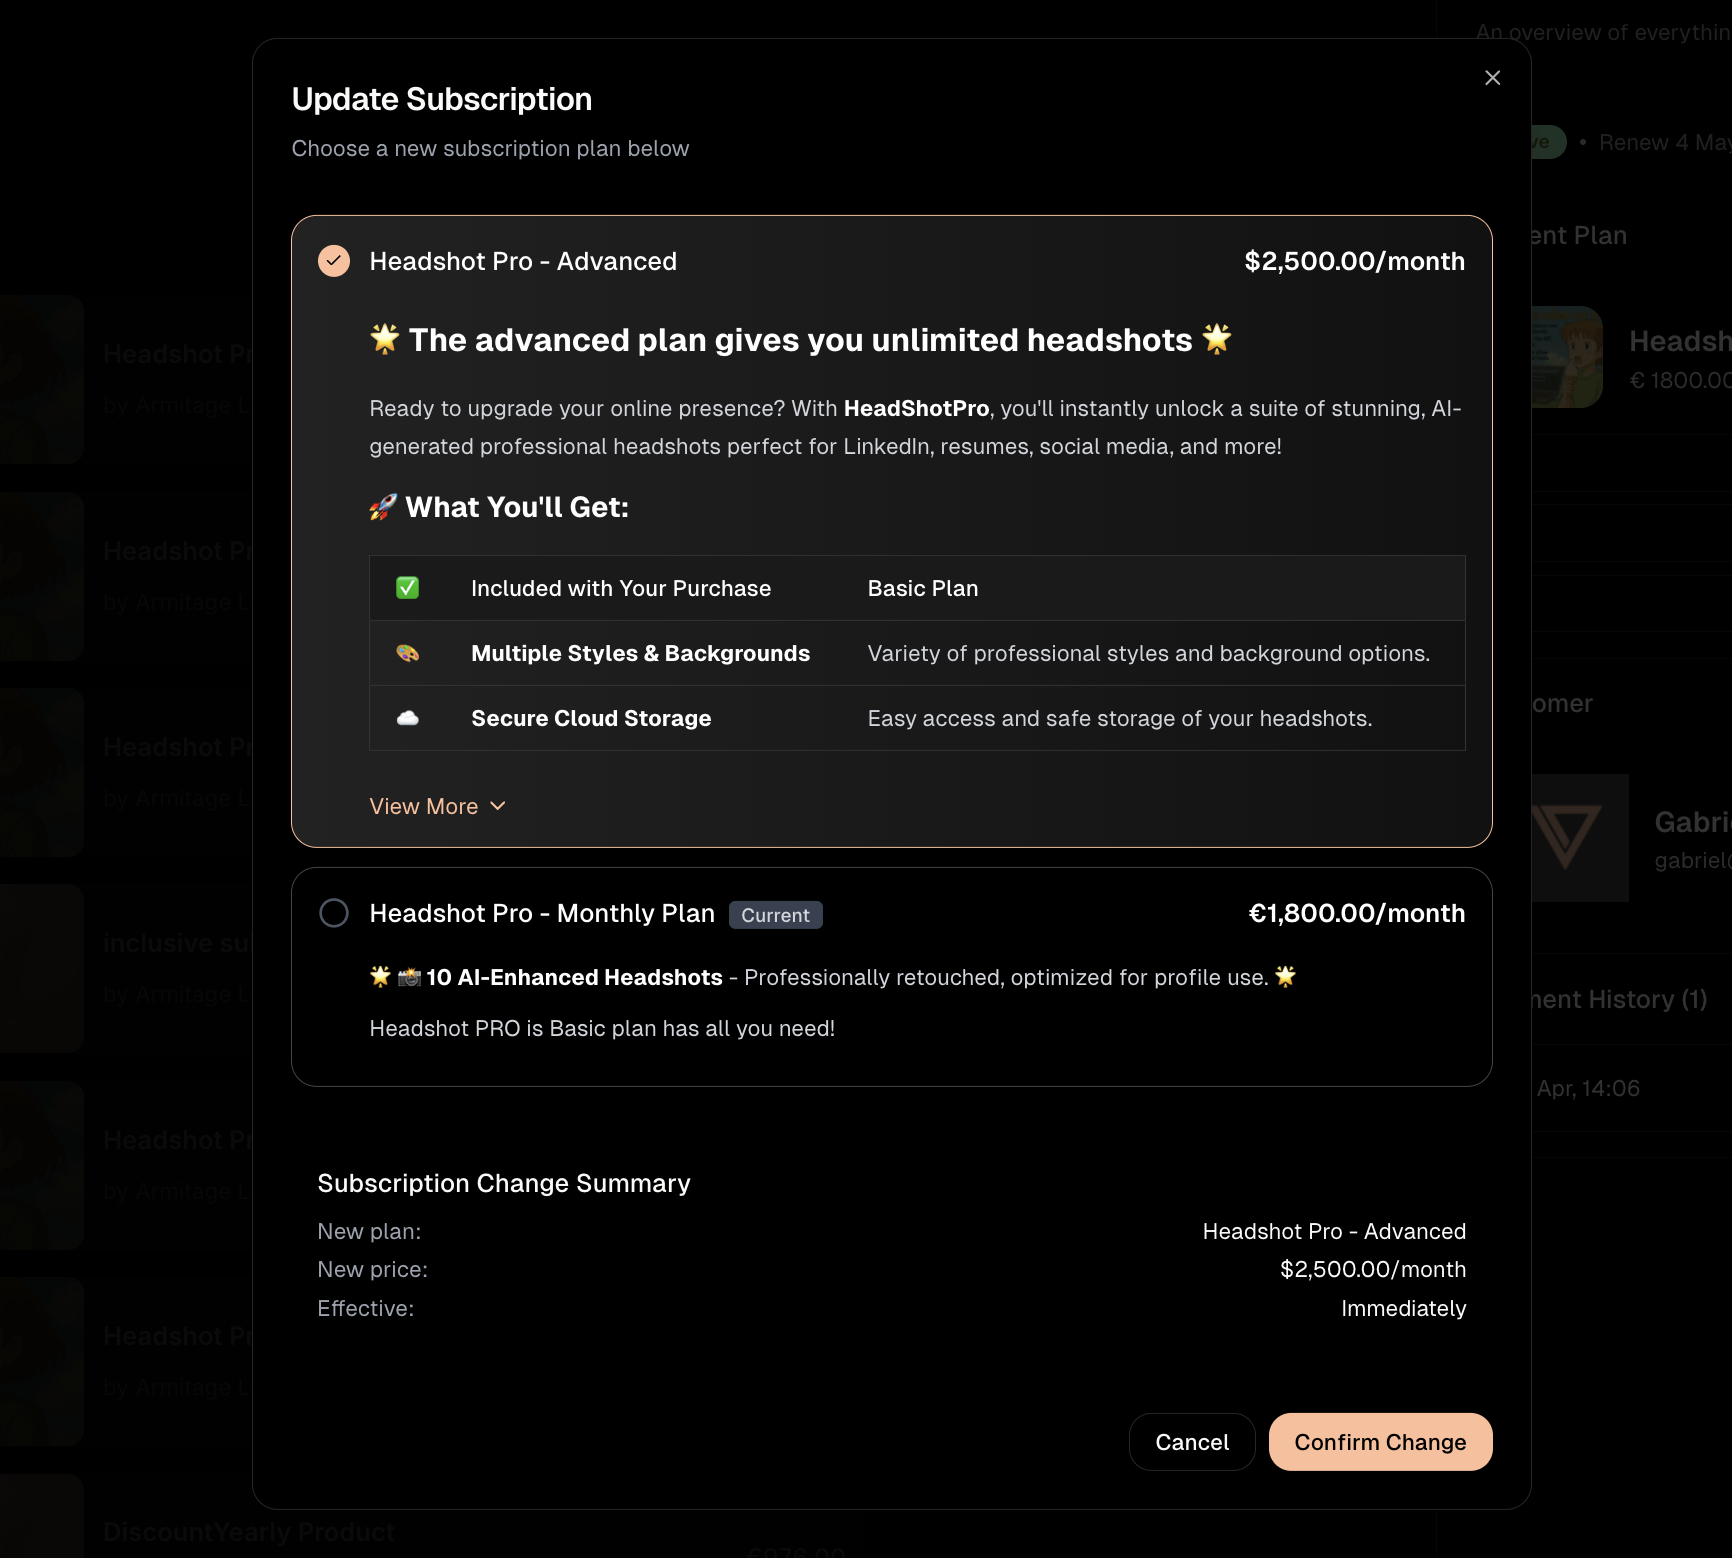
 ### Billing after subscription updates
The new amount will be charged upon subscription renewal. If you need pro-rata charges or different use cases, contact the Creem team.
### Billing after subscription updates
The new amount will be charged upon subscription renewal. If you need pro-rata charges or different use cases, contact the Creem team.
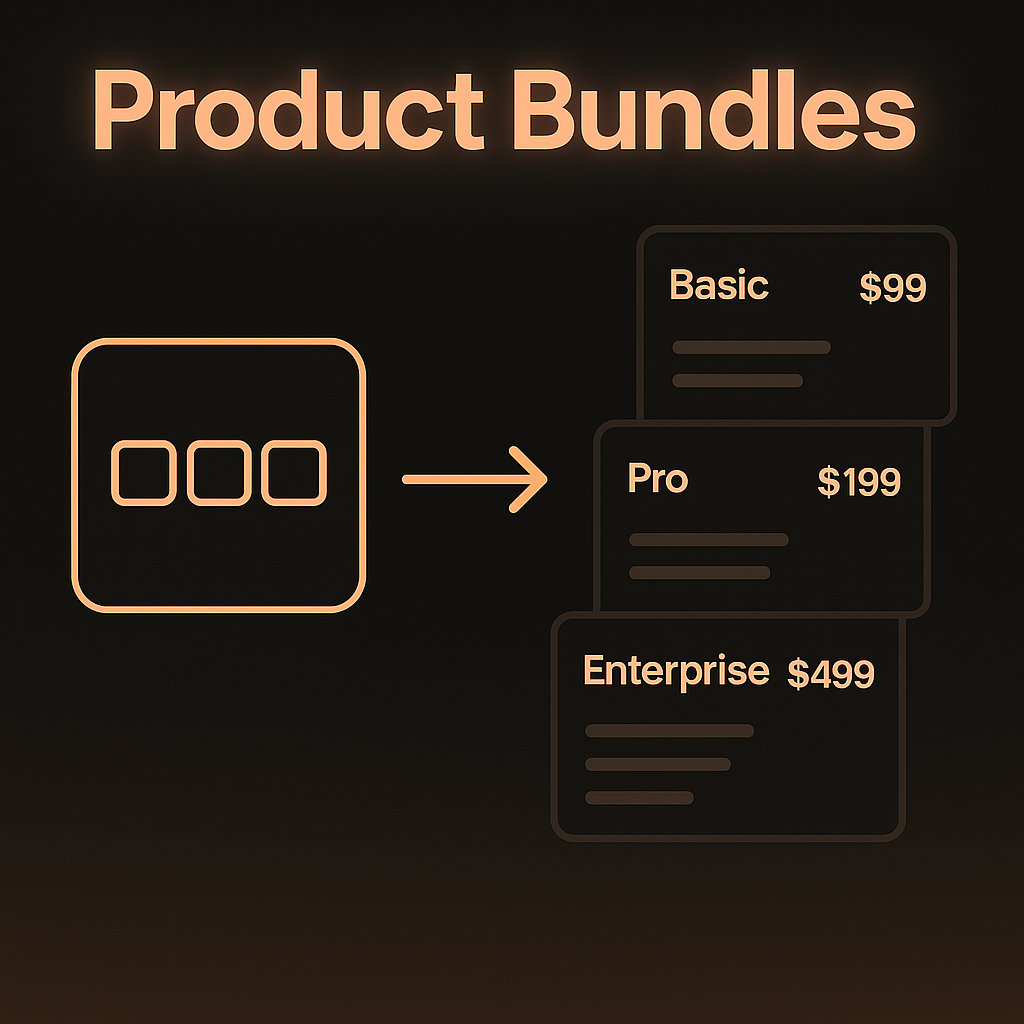 ## Understanding Product Bundles
### What are Product Bundles?
Product Bundles are collections of related products that:
* Share similar characteristics
* Represent different tiers or levels of the same service
* Work together as part of a broader offering
* Enable streamlined product management
### Key Benefits
## Understanding Product Bundles
### What are Product Bundles?
Product Bundles are collections of related products that:
* Share similar characteristics
* Represent different tiers or levels of the same service
* Work together as part of a broader offering
* Enable streamlined product management
### Key Benefits

 ## Best Practices
### Bundle Structure
1. **Logical Grouping**
* Group products that naturally belong together
* Maintain clear relationships between products
* Use consistent naming conventions across tiers
2. **Value Proposition**
* Clearly differentiate features between tiers
* Maintain logical price progression
* Highlight the benefits of each tier
3. **Bundle Organization**
* Keep bundles focused and specific
* Avoid mixing unrelated products
* Maintain clear documentation of bundle contents
# Introduction
Source: https://docs.creem.io/learn/billing/subscriptions/introduction
Subscriptions in Creem allow you to create recurring payment plans for your products and services. This documentation will guide you through the key concepts and implementation details of the subscription system.
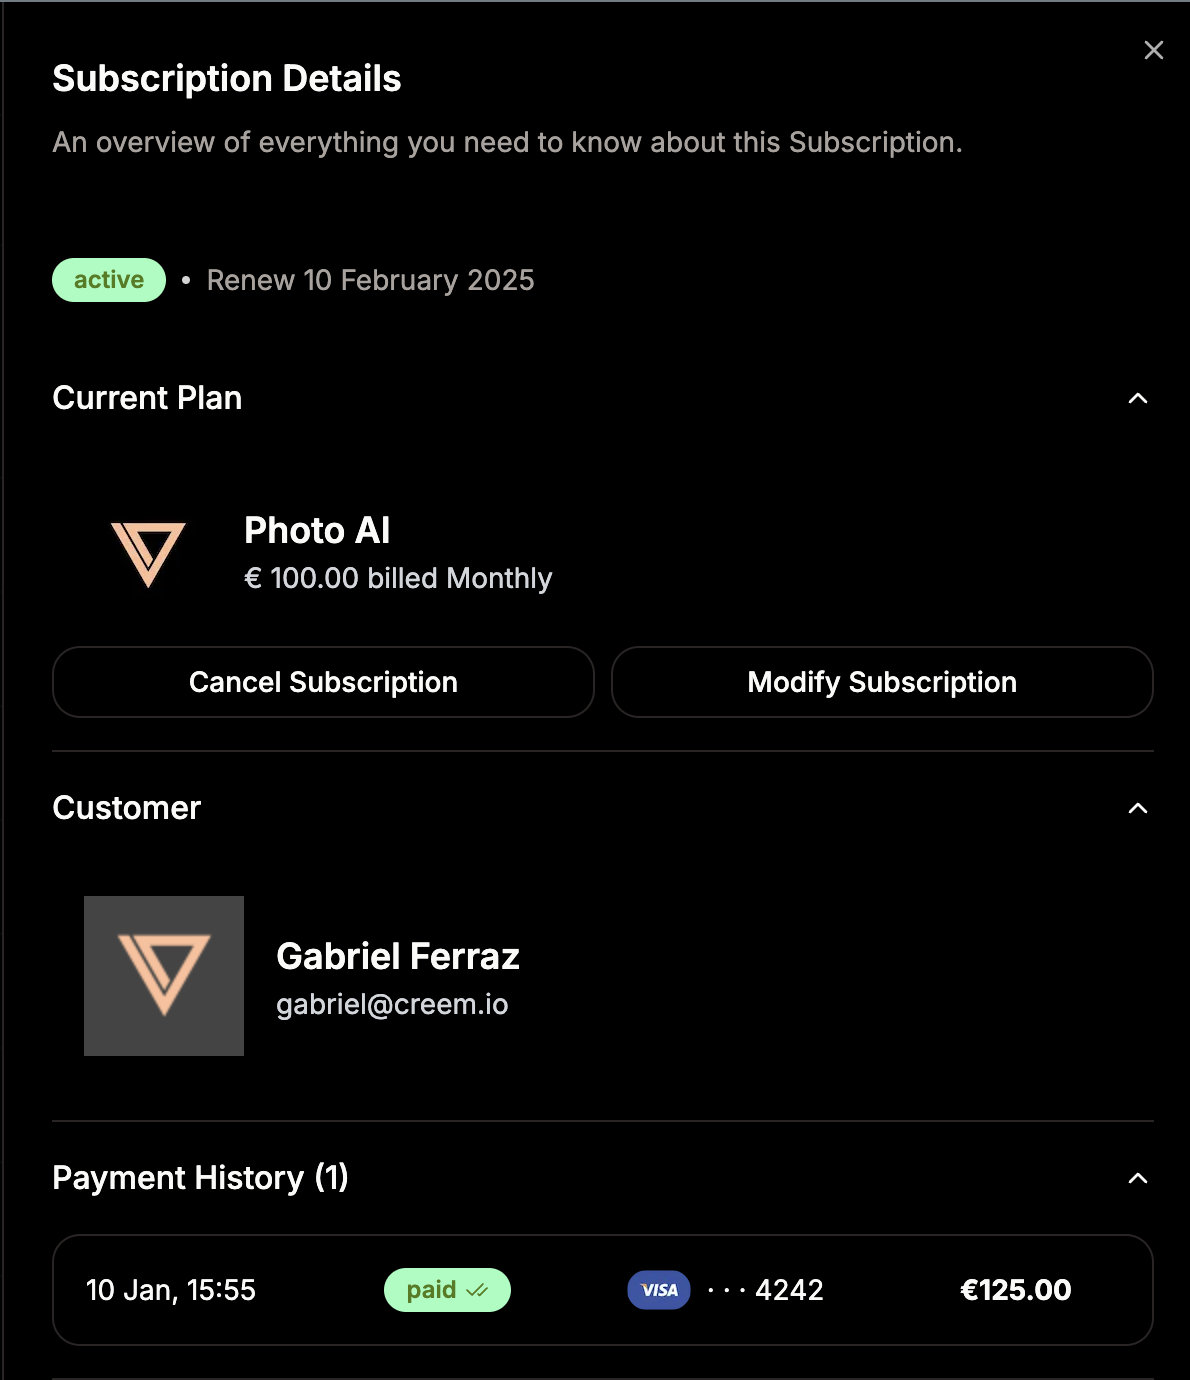
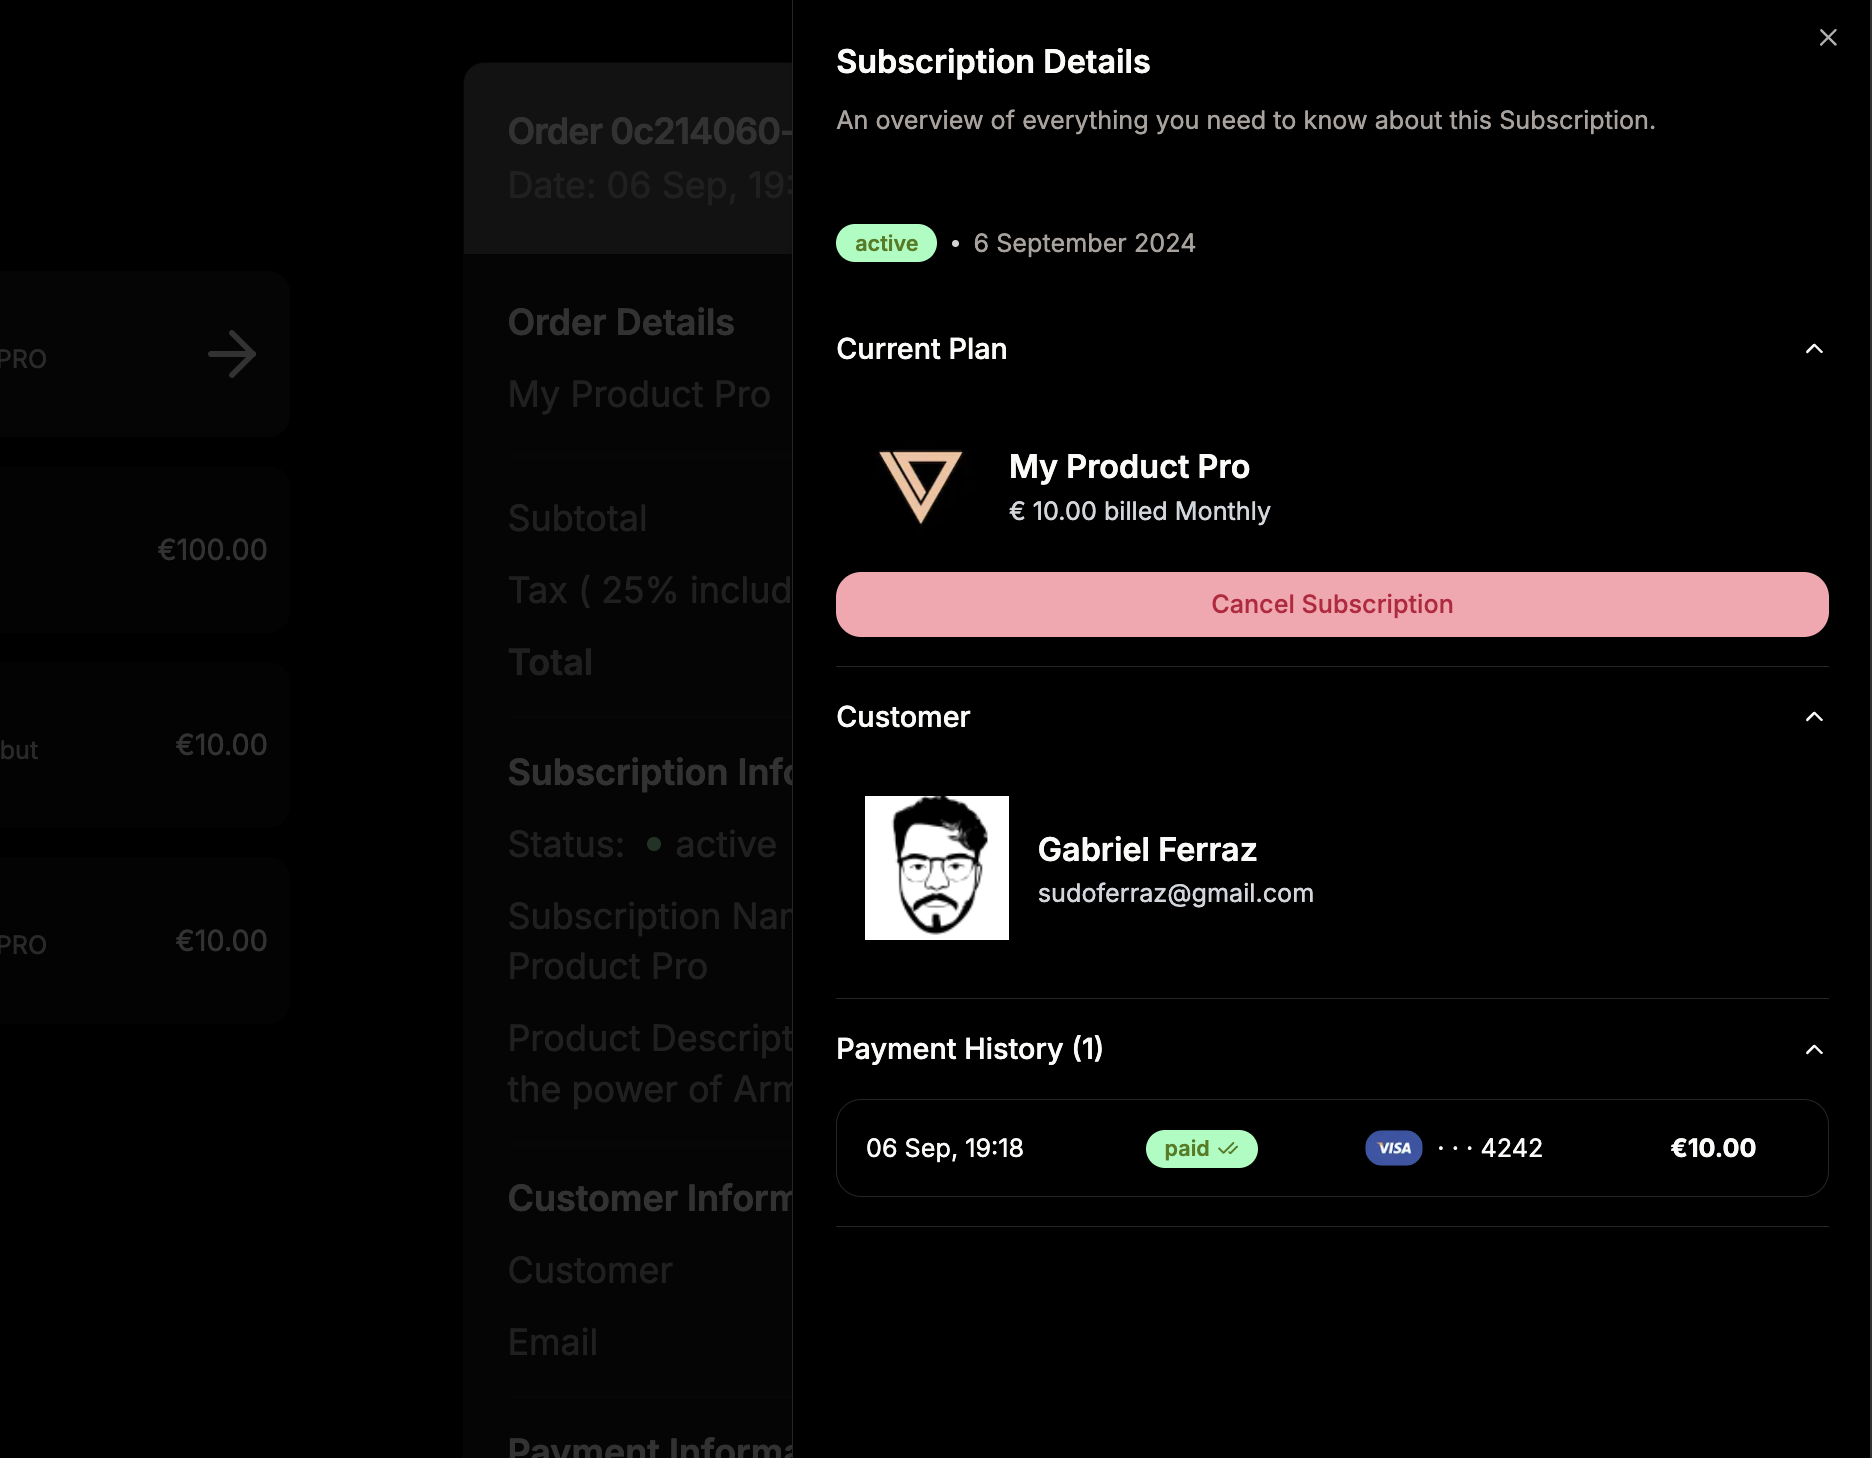
## Understanding Subscriptions
A subscription represents a recurring payment agreement between you and your customer. When a customer subscribes to your product, they agree to be billed periodically (monthly, yearly, etc.) until they cancel their subscription.
## Key Concepts
### Subscription Status
A subscription can be in different states throughout its lifecycle:
* **Active:** The subscription is current and payments are being processed normally
* **Past Due:** A payment attempt has failed but the subscription is still active and retrying.
* **Canceled:** The subscription has been terminated
* **Trialing:** The subscription is in a trial period before the first payment
* **Incomplete:** The subscription and checkout session was created but not paid
### Billing Cycles
Subscriptions operate on billing cycles that determine when payments are collected. You can set up various billing intervals:
* Monthly billing
* Yearly billing
* Custom intervals (quarterly, 6 months, etc.)
## Creating a Subscription
To create a subscription, you'll need to:
1. Set up a subscription product in your Creem dashboard
2. Generate a checkout session for the subscription
3. Direct your customer to the checkout URL
### Code Example
```jsx
const subscriptionCheckout = await axios.post(
`https://api.creem.io/v1/checkouts`,
{
product_id: 'prod_your-subscription-id',
},
{
headers: { "x-api-key": `creem_123456789` },
}
);
```
For more details on checkout session options, navigate to our [Checkout Session Introduction](https://docs.creem.io/learn/checkout-session/introduction)
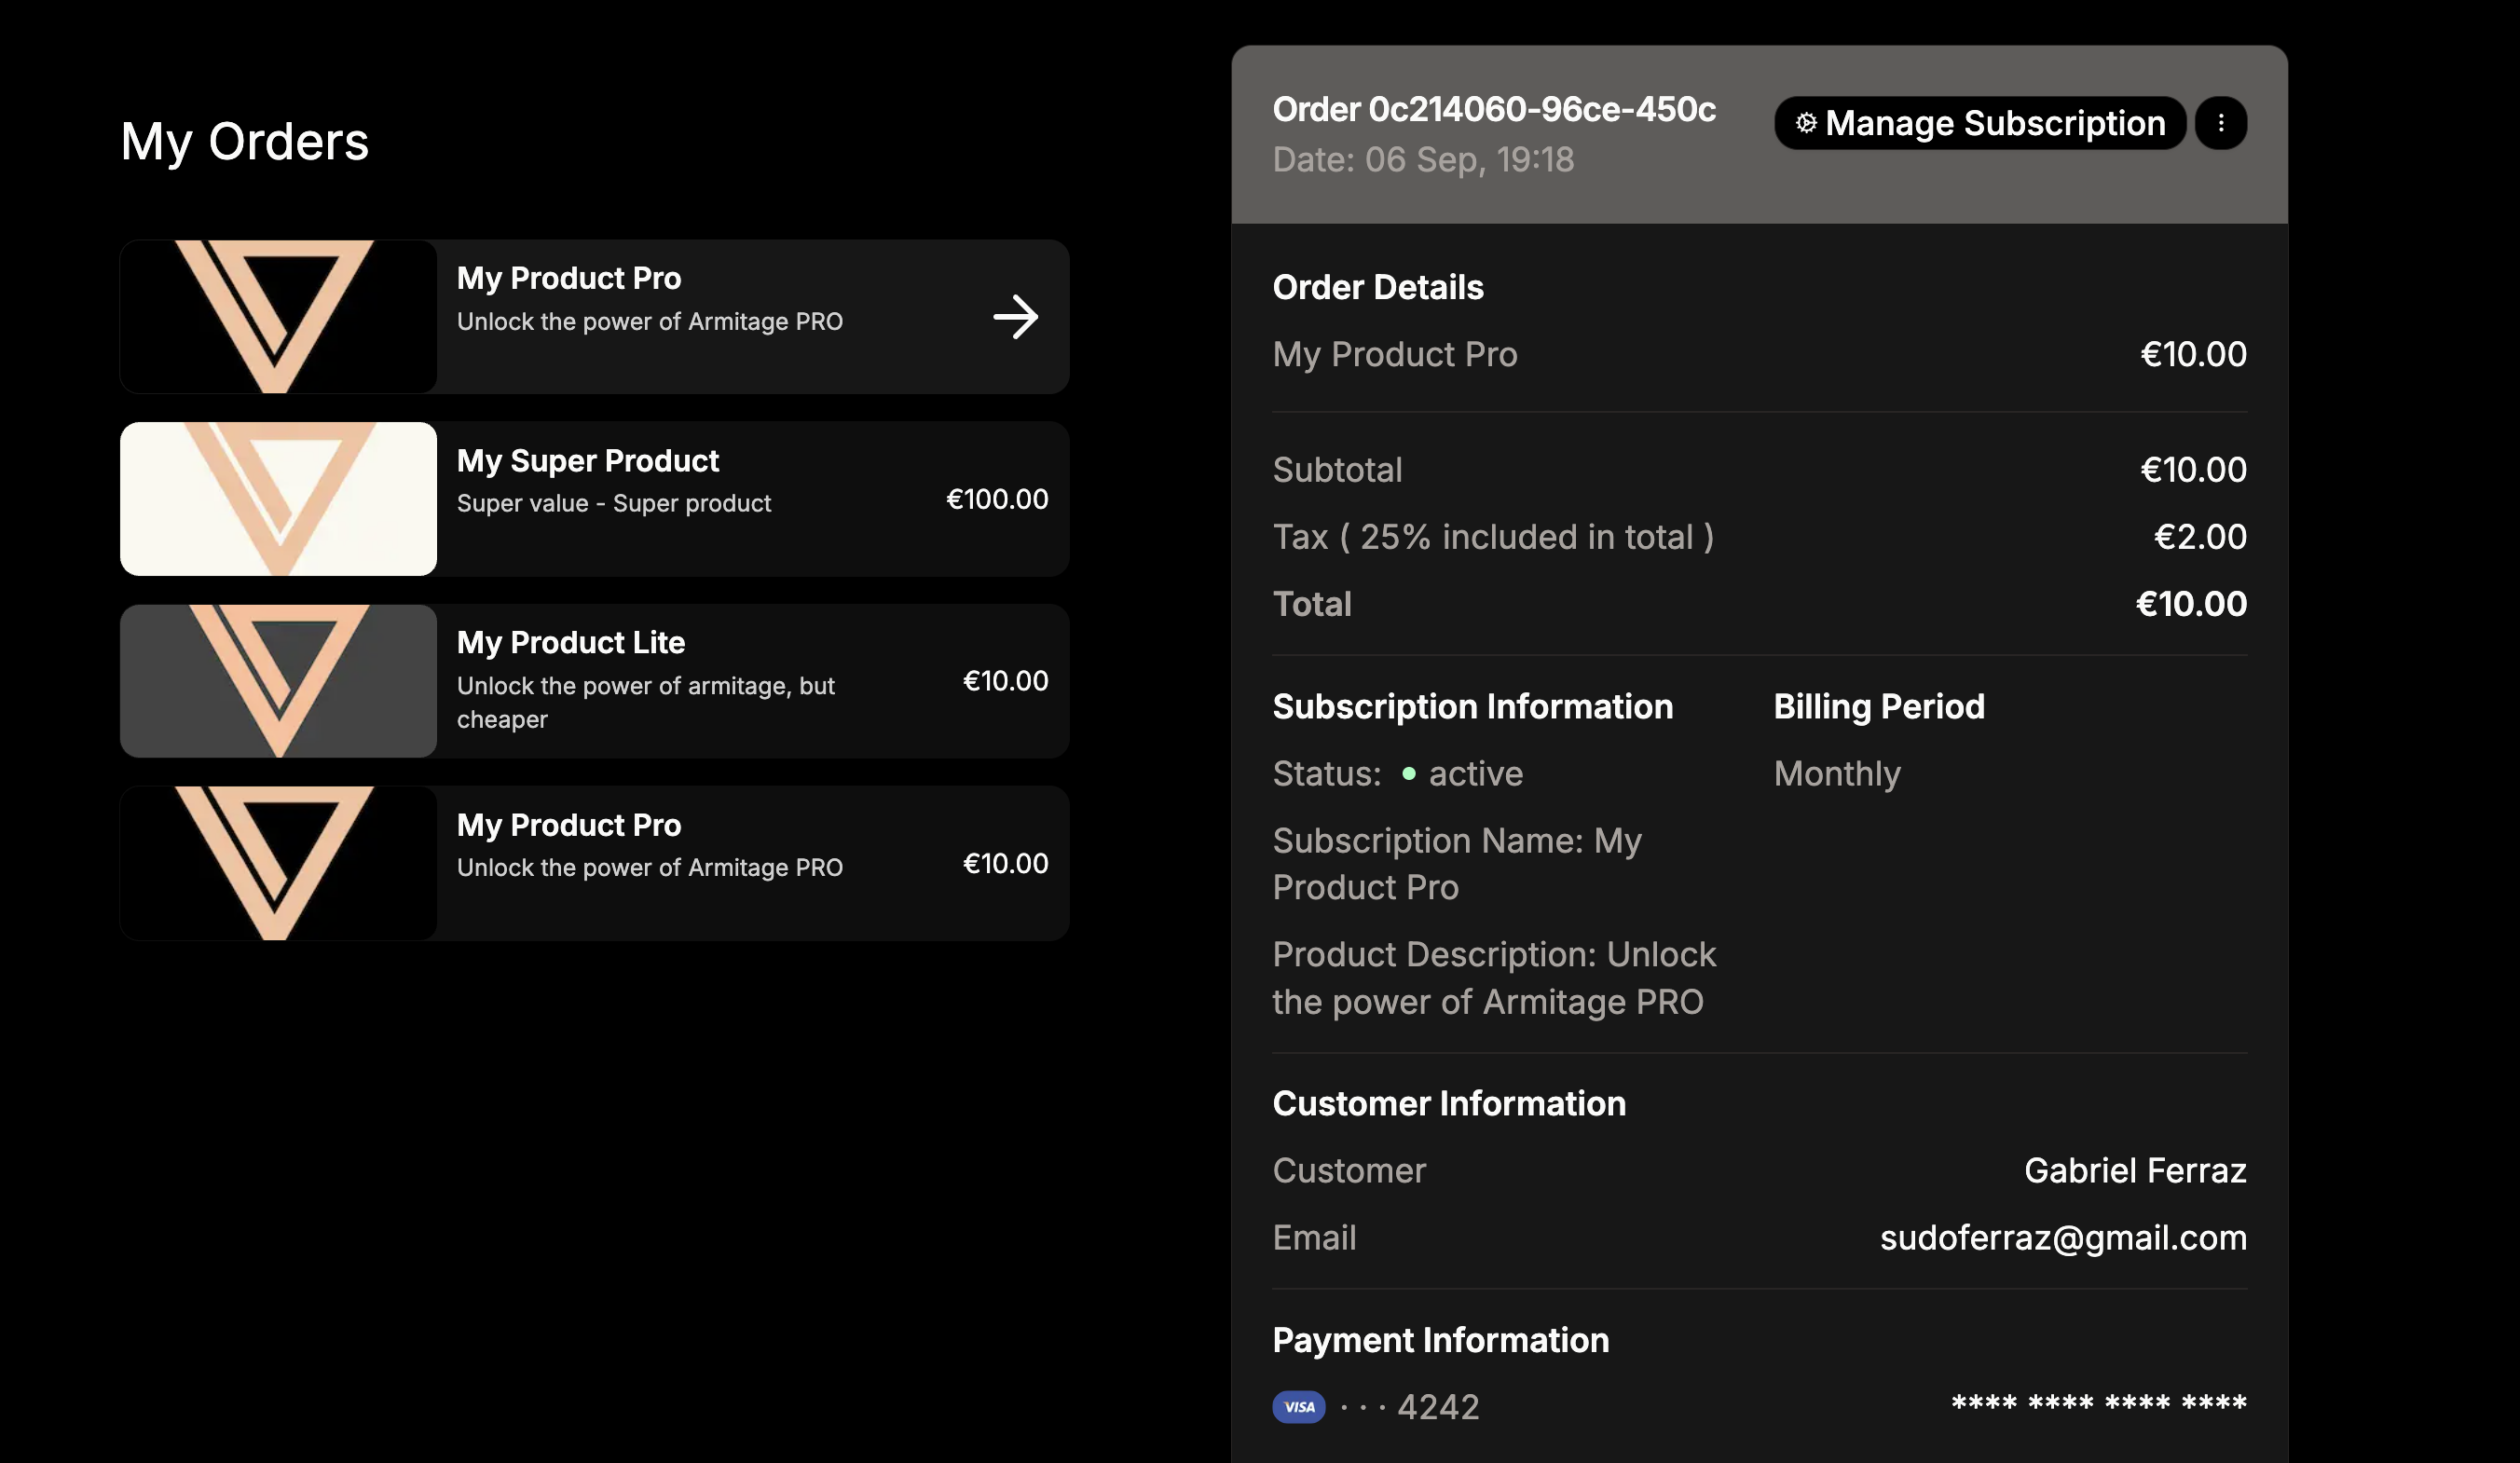
## Managing Subscriptions
Creem provides several ways to manage active subscriptions:
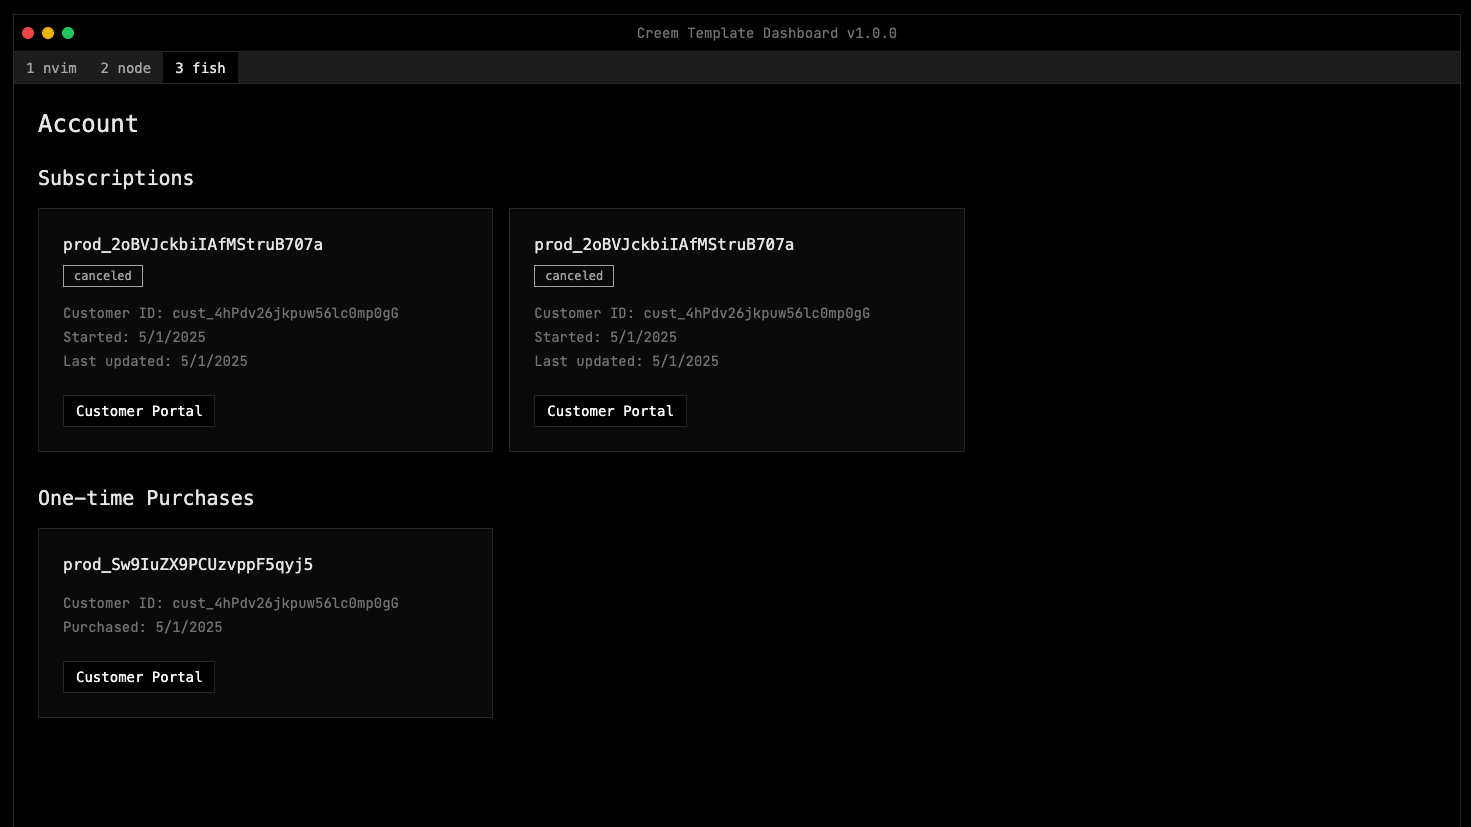
* **Update billing information:** Customers can update their payment method through the customer portal
* **Cancel subscriptions:** Customers or merchants can cancel at any time, through the Dashboard, customer portal or APIs
* **Change prices:** Merchants can update the price of a subscription, that takes into effect in the next billing cycle
* **Seat Based Billing:** Merchants can update the usage of a specific subscription based on seats or units through the Dashboard or API
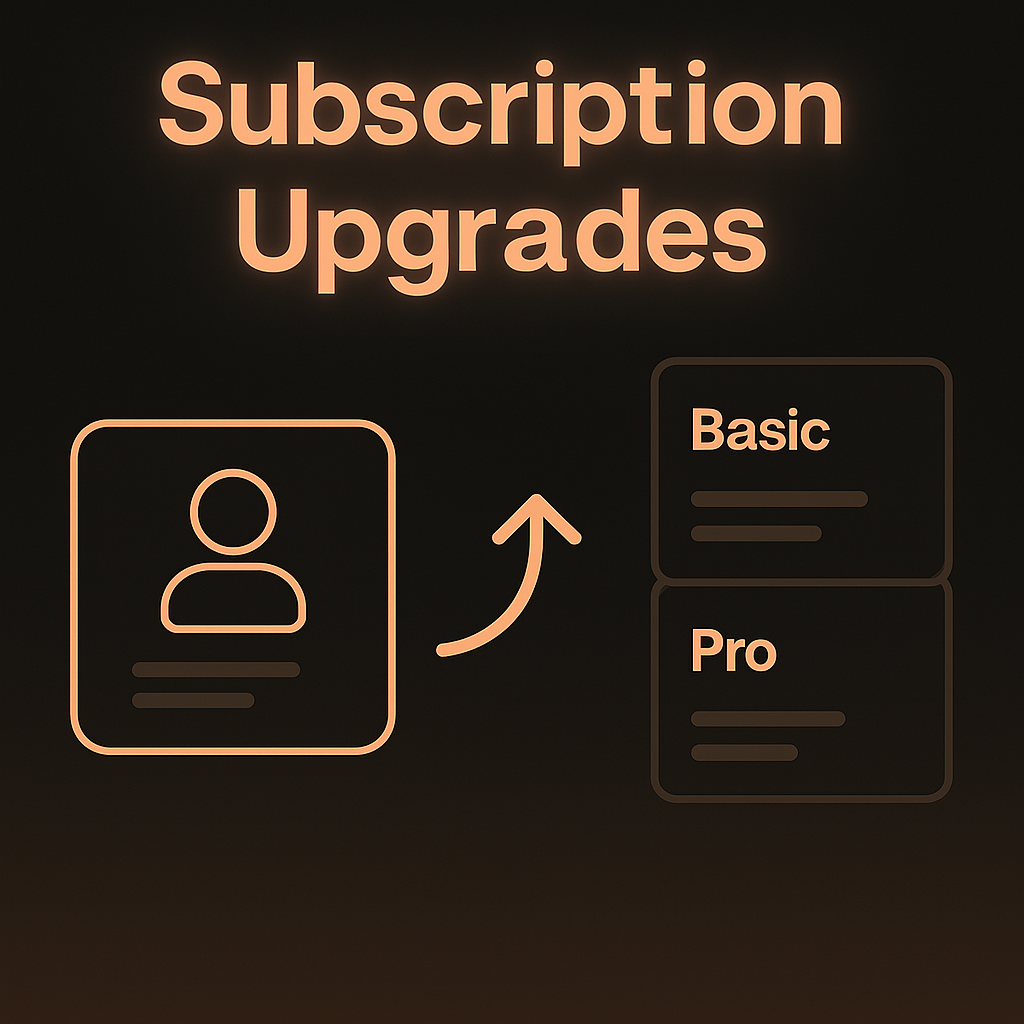
# Subscription Upgrades
Source: https://docs.creem.io/learn/billing/subscriptions/upgrades
Learn how to manage subscription upgrades and downgrades using Product Bundles in Creem
## Overview
Subscription upgrades and downgrades in Creem provide a seamless experience for both merchants and customers. When paired with Product Bundles, this functionality becomes even more powerful, enabling self-service subscription management and strategic upsell opportunities.
## Best Practices
### Bundle Structure
1. **Logical Grouping**
* Group products that naturally belong together
* Maintain clear relationships between products
* Use consistent naming conventions across tiers
2. **Value Proposition**
* Clearly differentiate features between tiers
* Maintain logical price progression
* Highlight the benefits of each tier
3. **Bundle Organization**
* Keep bundles focused and specific
* Avoid mixing unrelated products
* Maintain clear documentation of bundle contents
# Introduction
Source: https://docs.creem.io/learn/billing/subscriptions/introduction
Subscriptions in Creem allow you to create recurring payment plans for your products and services. This documentation will guide you through the key concepts and implementation details of the subscription system.
## Understanding Subscriptions
A subscription represents a recurring payment agreement between you and your customer. When a customer subscribes to your product, they agree to be billed periodically (monthly, yearly, etc.) until they cancel their subscription.
## Key Concepts
### Subscription Status
A subscription can be in different states throughout its lifecycle:
* **Active:** The subscription is current and payments are being processed normally
* **Past Due:** A payment attempt has failed but the subscription is still active and retrying.
* **Canceled:** The subscription has been terminated
* **Trialing:** The subscription is in a trial period before the first payment
* **Incomplete:** The subscription and checkout session was created but not paid
### Billing Cycles
Subscriptions operate on billing cycles that determine when payments are collected. You can set up various billing intervals:
* Monthly billing
* Yearly billing
* Custom intervals (quarterly, 6 months, etc.)
## Creating a Subscription
To create a subscription, you'll need to:
1. Set up a subscription product in your Creem dashboard
2. Generate a checkout session for the subscription
3. Direct your customer to the checkout URL
### Code Example
```jsx
const subscriptionCheckout = await axios.post(
`https://api.creem.io/v1/checkouts`,
{
product_id: 'prod_your-subscription-id',
},
{
headers: { "x-api-key": `creem_123456789` },
}
);
```
For more details on checkout session options, navigate to our [Checkout Session Introduction](https://docs.creem.io/learn/checkout-session/introduction)
## Managing Subscriptions
Creem provides several ways to manage active subscriptions:
* **Update billing information:** Customers can update their payment method through the customer portal
* **Cancel subscriptions:** Customers or merchants can cancel at any time, through the Dashboard, customer portal or APIs
* **Change prices:** Merchants can update the price of a subscription, that takes into effect in the next billing cycle
* **Seat Based Billing:** Merchants can update the usage of a specific subscription based on seats or units through the Dashboard or API
# Subscription Upgrades
Source: https://docs.creem.io/learn/billing/subscriptions/upgrades
Learn how to manage subscription upgrades and downgrades using Product Bundles in Creem
## Overview
Subscription upgrades and downgrades in Creem provide a seamless experience for both merchants and customers. When paired with Product Bundles, this functionality becomes even more powerful, enabling self-service subscription management and strategic upsell opportunities.
 ## Enhanced Experience with Product Bundles
Product Bundles significantly improve the subscription management experience by:
* **Self-Service Management**: Customers can upgrade or downgrade their subscriptions independently through the Customer Portal
* **Transparent Tier Comparison**: Clear visualization of features and benefits across different subscription tiers
* **Streamlined Checkout Upsells**: Present upgrade options during the initial checkout process to increase conversion to higher tiers
* **Simplified Product Organization**: Group related subscription tiers logically for easier management
By implementing Product Bundles alongside your subscription offerings, you create a more intuitive experience that empowers customers while maximizing your revenue potential through strategic tier positioning.
## Enhanced Experience with Product Bundles
Product Bundles significantly improve the subscription management experience by:
* **Self-Service Management**: Customers can upgrade or downgrade their subscriptions independently through the Customer Portal
* **Transparent Tier Comparison**: Clear visualization of features and benefits across different subscription tiers
* **Streamlined Checkout Upsells**: Present upgrade options during the initial checkout process to increase conversion to higher tiers
* **Simplified Product Organization**: Group related subscription tiers logically for easier management
By implementing Product Bundles alongside your subscription offerings, you create a more intuitive experience that empowers customers while maximizing your revenue potential through strategic tier positioning.
 ### 2. Request Invoice or Support
Customers using the customer portal, can copy all details of a specific payment, including order\_ID and request support from Creem team directly without contacting the merchant.
### 2. Request Invoice or Support
Customers using the customer portal, can copy all details of a specific payment, including order\_ID and request support from Creem team directly without contacting the merchant.
 ### 3. Request Customer Portal Login through the API
Merchants can generate a customer portal login for their users, using the API, providing the `customer_id`.
The API responds a URL, that the merchant can then use to redirect their customer to the customer portal.
### 3. Request Customer Portal Login through the API
Merchants can generate a customer portal login for their users, using the API, providing the `customer_id`.
The API responds a URL, that the merchant can then use to redirect their customer to the customer portal.
 ## Why Customize Branding?
* **Consistent brand experience** from your app to checkout and receipts
* **Build trust** with your customers
* **Increase conversion** by reducing friction and confusion
## Why Customize Branding?
* **Consistent brand experience** from your app to checkout and receipts
* **Build trust** with your customers
* **Increase conversion** by reducing friction and confusion
 ## Test Mode vs Live Mode
You can safely experiment with different branding options in test mode—these changes won't affect your live checkout. When you're ready, switch to live mode and apply your final branding for real customers.
## Test Mode vs Live Mode
You can safely experiment with different branding options in test mode—these changes won't affect your live checkout. When you're ready, switch to live mode and apply your final branding for real customers.
?theme=light or ?theme=dark to your checkout URL before redirecting your customers.
[https://www.creem.io/payment/prod\_3pcofZ4pTXtuvdDb1j2MMp?theme=dark](https://www.creem.io/payment/prod_3pcofZ4pTXtuvdDb1j2MMp?theme=dark)
## Best Practices
* Use metadata to track users, campaigns, or any custom info
* Choose a theme that matches your brand or context
* Test your payment links before sharing widely
* Share links anywhere: email, chat, social, QR codes, and more
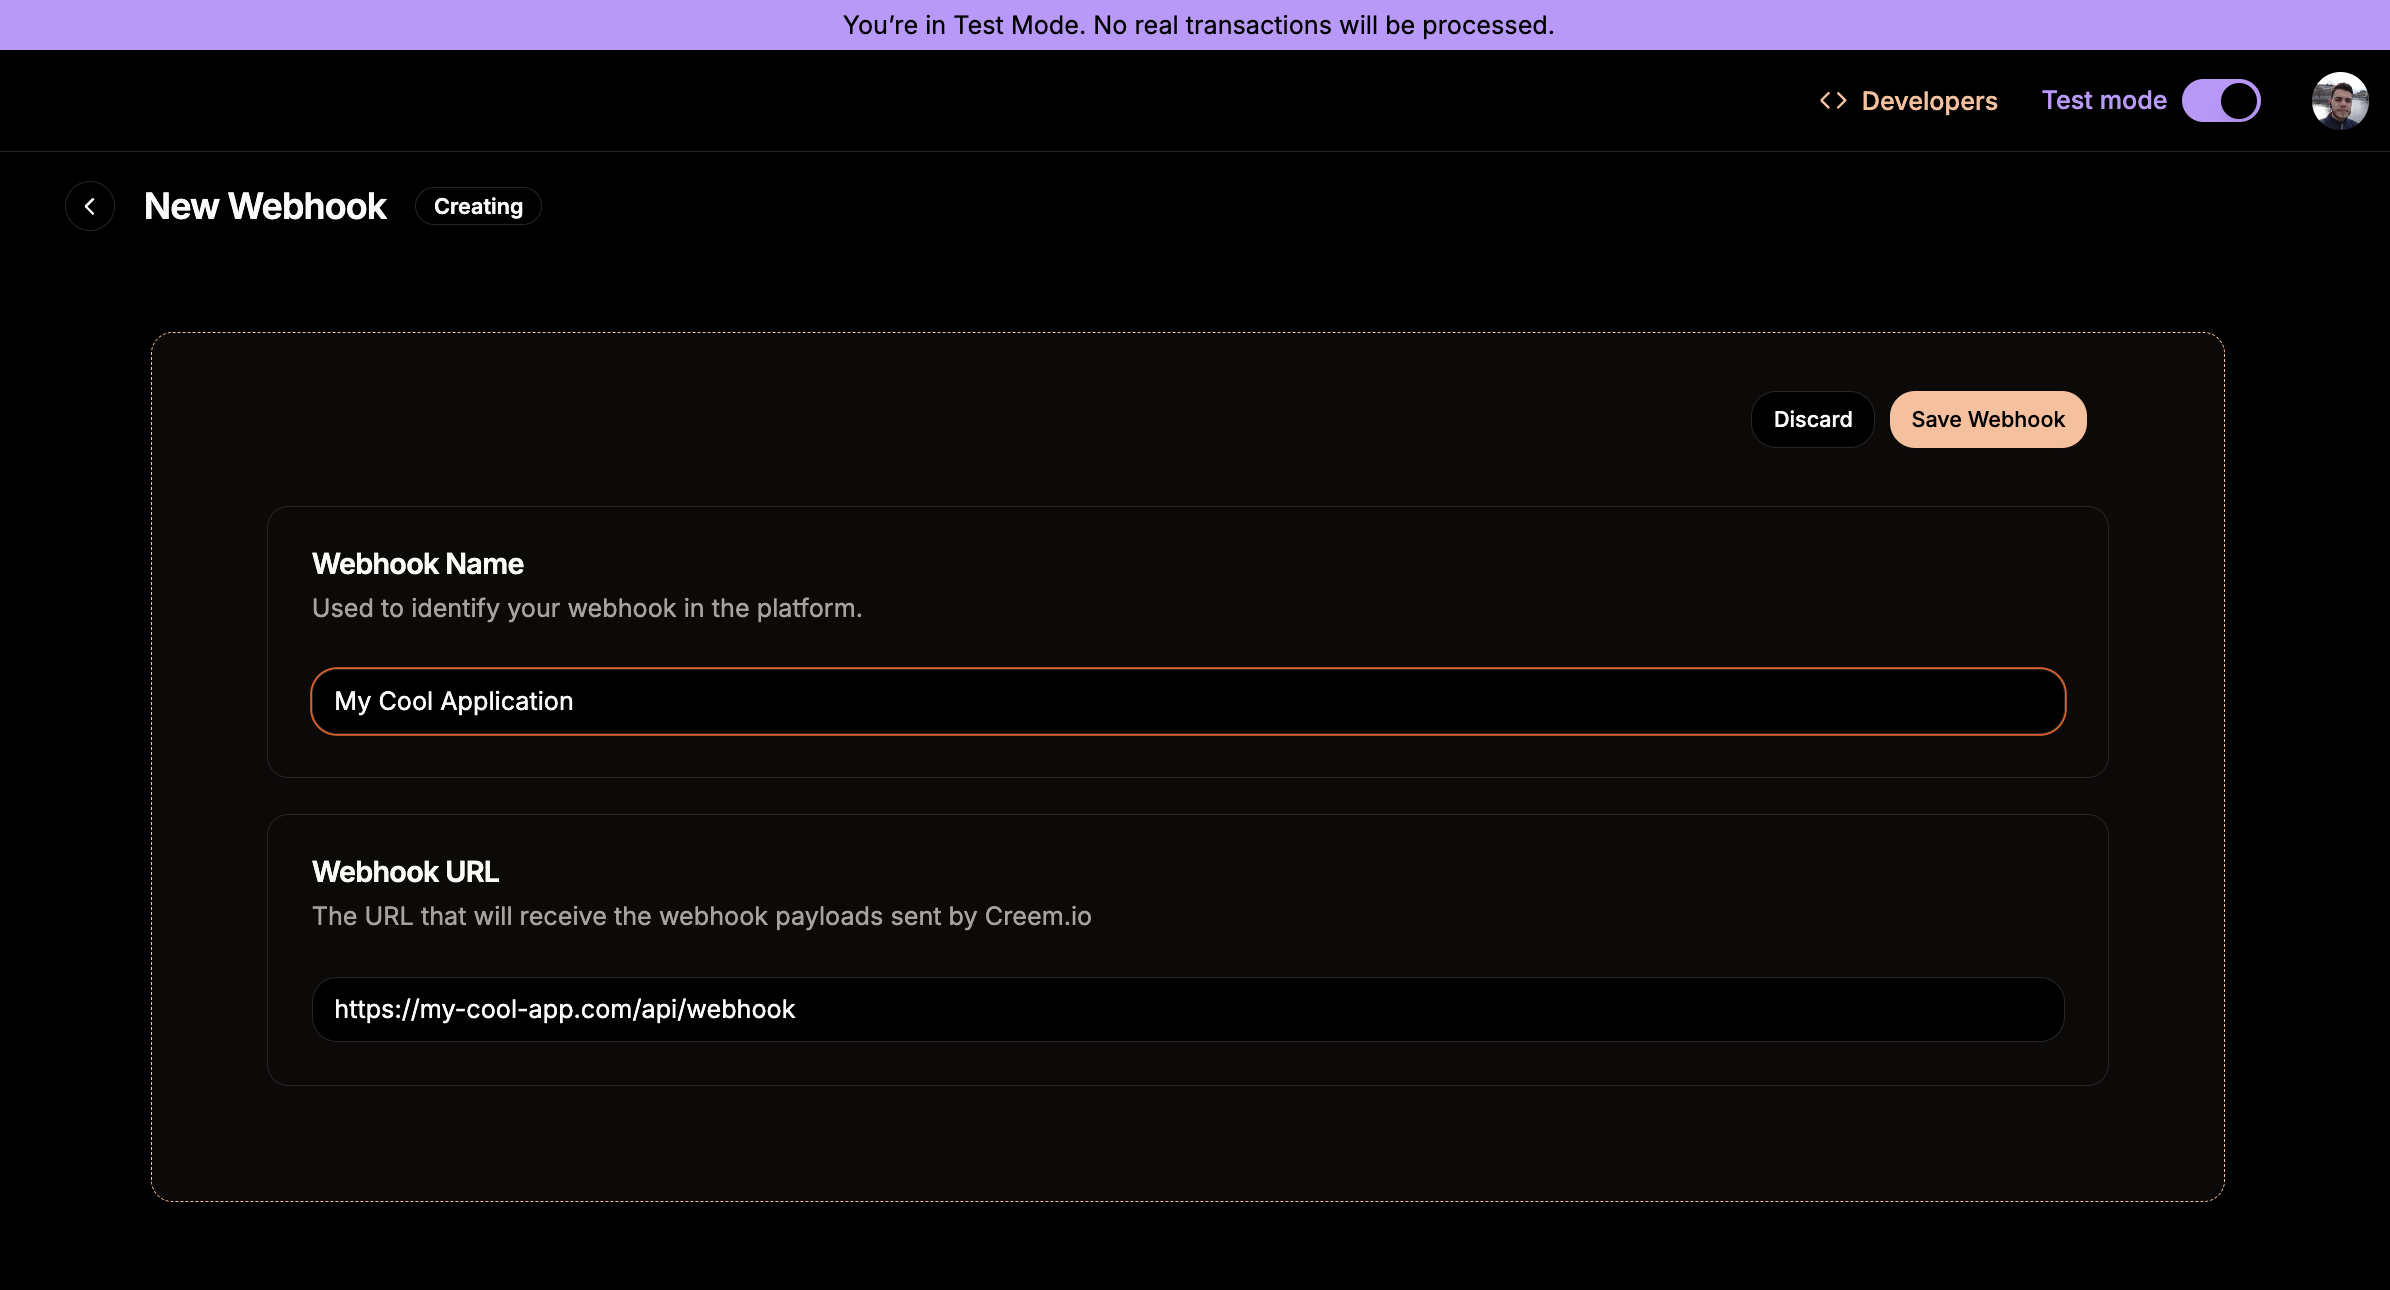
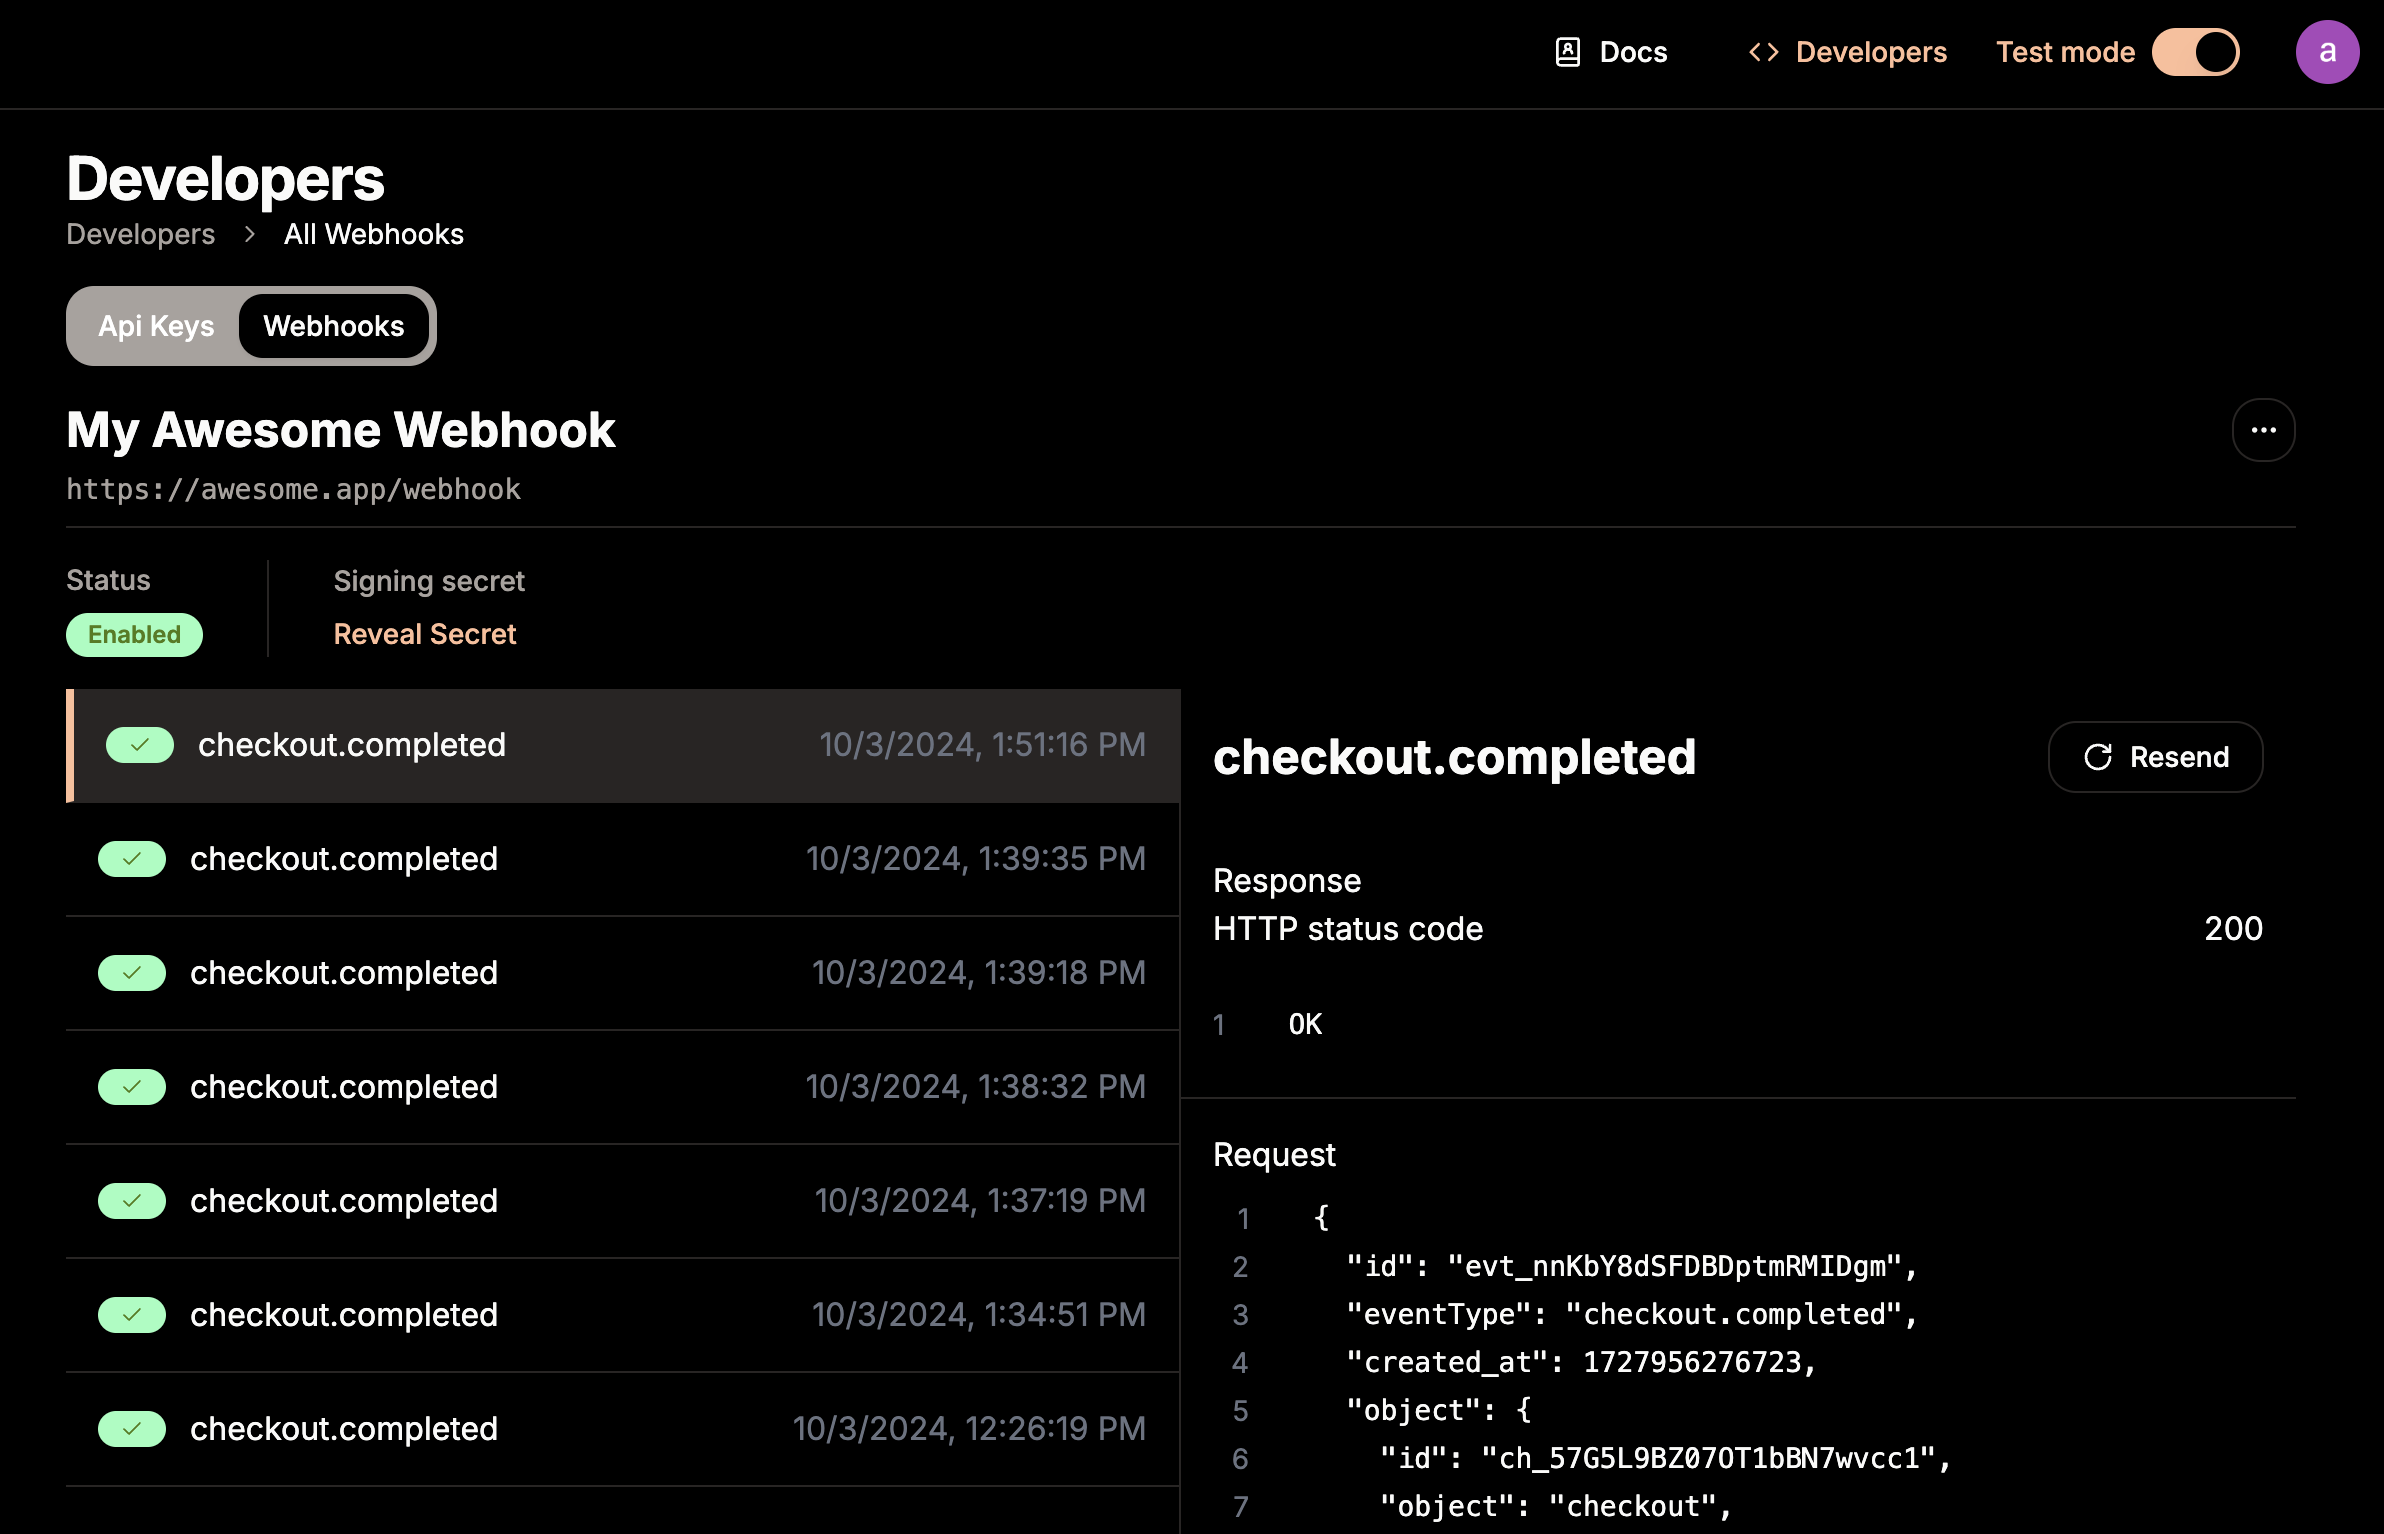
# Event Types
Source: https://docs.creem.io/learn/webhooks/event-types
List of supported event types and their payloads.
## checkout.completed
A checkout session was completed, returning all the information about the payment and the order created.
 ### 3. Test that your webhook endpoint is working properly
Create a few test payments to check that your webhook endpoint is receiving the events.
### 4. Deploy your webhook endpoint
After you’re done testing, deploy your webhook endpoint to production.
### 5. Register your production webhook endpoint
Once your webhook endpoint is deployed to production, you can register it in the Creem dashboard.
# Verify Webhook Requests
Source: https://docs.creem.io/learn/webhooks/verify-webhook-requests
How to verify Creem signature on webhook objects.
## How to verify Creem signature?
Creem signature is sent in the `creem-signature` header of the webhook request. The signature is generated using the HMAC-SHA256 algorithm with the webhook secret as the key, and the request payload as the message.
### 3. Test that your webhook endpoint is working properly
Create a few test payments to check that your webhook endpoint is receiving the events.
### 4. Deploy your webhook endpoint
After you’re done testing, deploy your webhook endpoint to production.
### 5. Register your production webhook endpoint
Once your webhook endpoint is deployed to production, you can register it in the Creem dashboard.
# Verify Webhook Requests
Source: https://docs.creem.io/learn/webhooks/verify-webhook-requests
How to verify Creem signature on webhook objects.
## How to verify Creem signature?
Creem signature is sent in the `creem-signature` header of the webhook request. The signature is generated using the HMAC-SHA256 algorithm with the webhook secret as the key, and the request payload as the message.
 To generate the signature, you can use the following code snippet:
```typescript
import * as crypto from 'crypto';
generateSignature(payload: string, secret: string): string {
const computedSignature = crypto
.createHmac('sha256', secret)
.update(payload)
.digest('hex');
return computedSignature;
}
```
In the code snippet above, the `payload` is the request body, and the `secret` is the webhook secret.
Simply compare the generated Signature with the one received on the header to complete the verification process.
# Quickstart
Source: https://docs.creem.io/quickstart
Learn how to receive your first payment in under 10 minutes
## Prerequisites
To get the most out of this guide, you'll need to:
* **Create an account on Creem.io**
## 1. Create a product
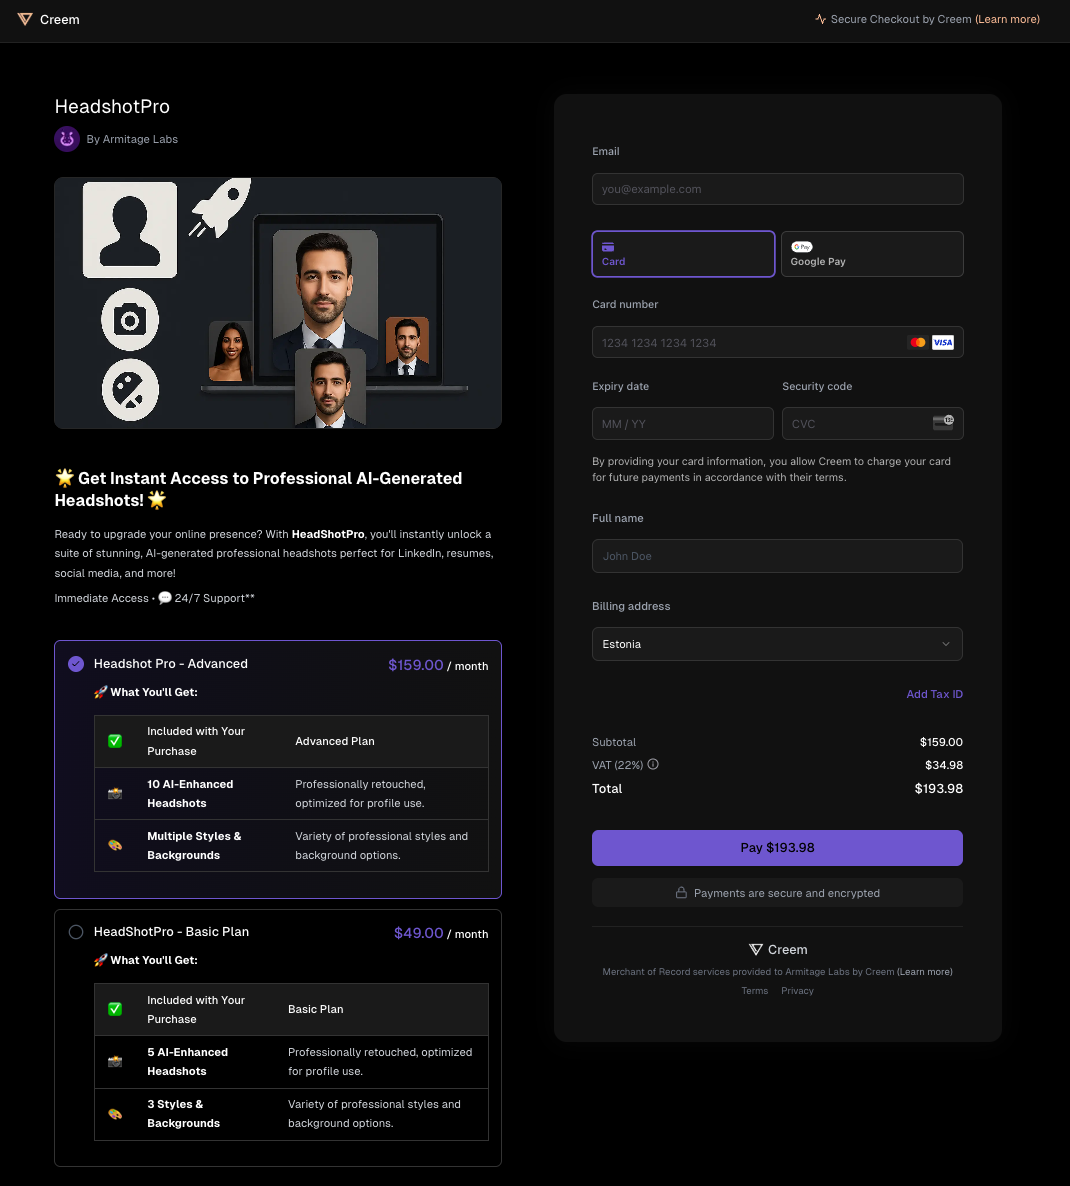
Go over to the [products tab](https://creem.io/dashboard/products) and create a product.
You can add a name, description, and price to your product. Optionally you can also add a picture to your product that will be shown to users.
To generate the signature, you can use the following code snippet:
```typescript
import * as crypto from 'crypto';
generateSignature(payload: string, secret: string): string {
const computedSignature = crypto
.createHmac('sha256', secret)
.update(payload)
.digest('hex');
return computedSignature;
}
```
In the code snippet above, the `payload` is the request body, and the `secret` is the webhook secret.
Simply compare the generated Signature with the one received on the header to complete the verification process.
# Quickstart
Source: https://docs.creem.io/quickstart
Learn how to receive your first payment in under 10 minutes
## Prerequisites
To get the most out of this guide, you'll need to:
* **Create an account on Creem.io**
## 1. Create a product
Go over to the [products tab](https://creem.io/dashboard/products) and create a product.
You can add a name, description, and price to your product. Optionally you can also add a picture to your product that will be shown to users.
 ## More use cases
If you are not planning to do a no-code integration, we strongly encourage you to check out our other guides.
Create checkout-sessions and prices dynamically, use webhooks to receive updates on your application automatically, and much more. Check out our guides to get the most out of Creem.
## More use cases
If you are not planning to do a no-code integration, we strongly encourage you to check out our other guides.
Create checkout-sessions and prices dynamically, use webhooks to receive updates on your application automatically, and much more. Check out our guides to get the most out of Creem.
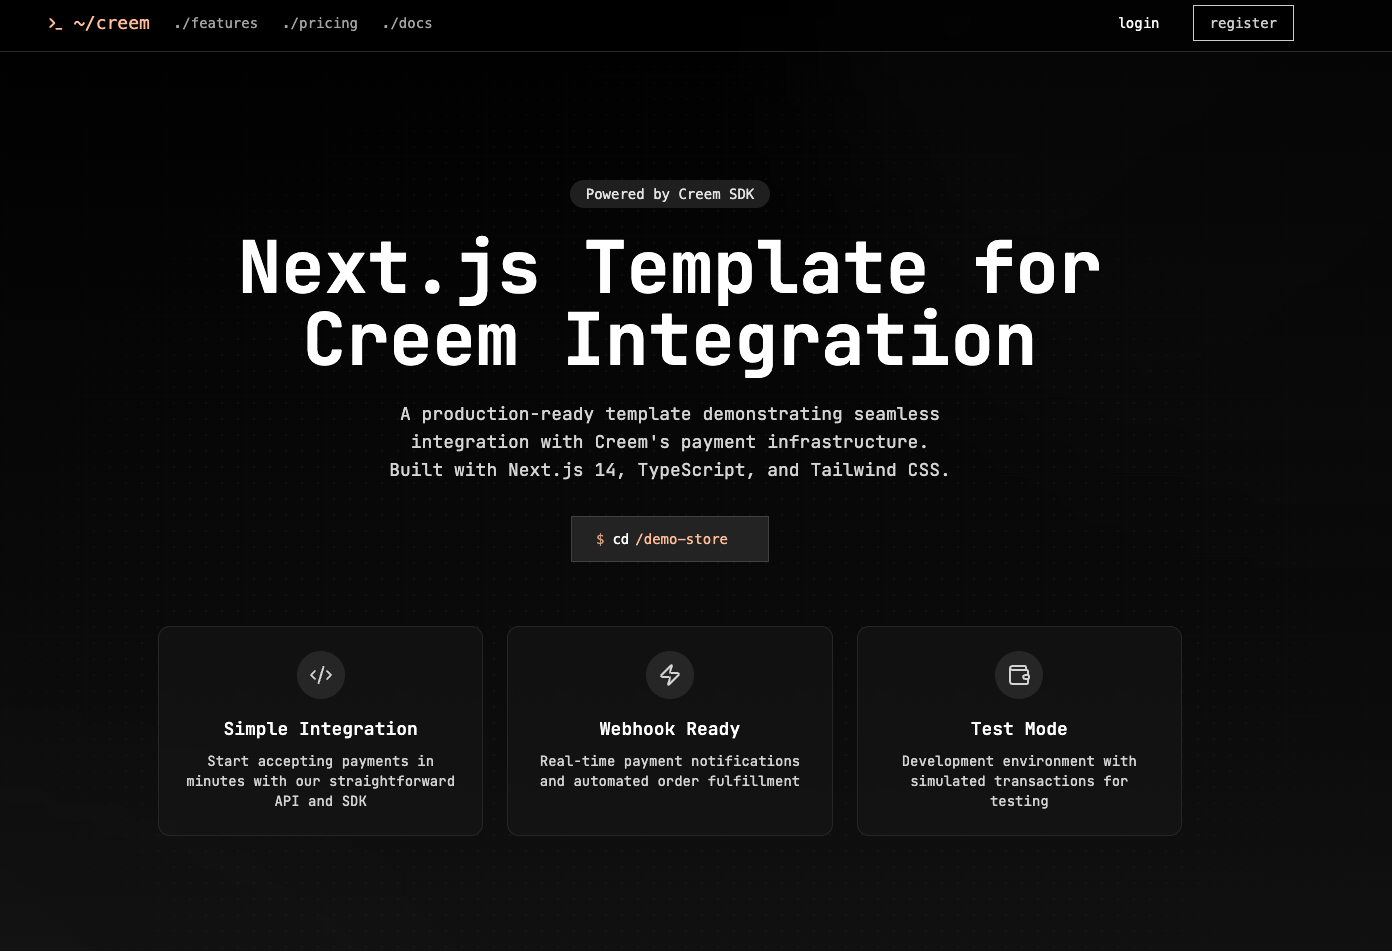

The template includes a step-by-step tutorial to help you get started and your account ready.
Allows you to test your products in a easy way, without having to manually set product IDs
Includes an account management page, to manage subscriptions, billing and customer portal links.
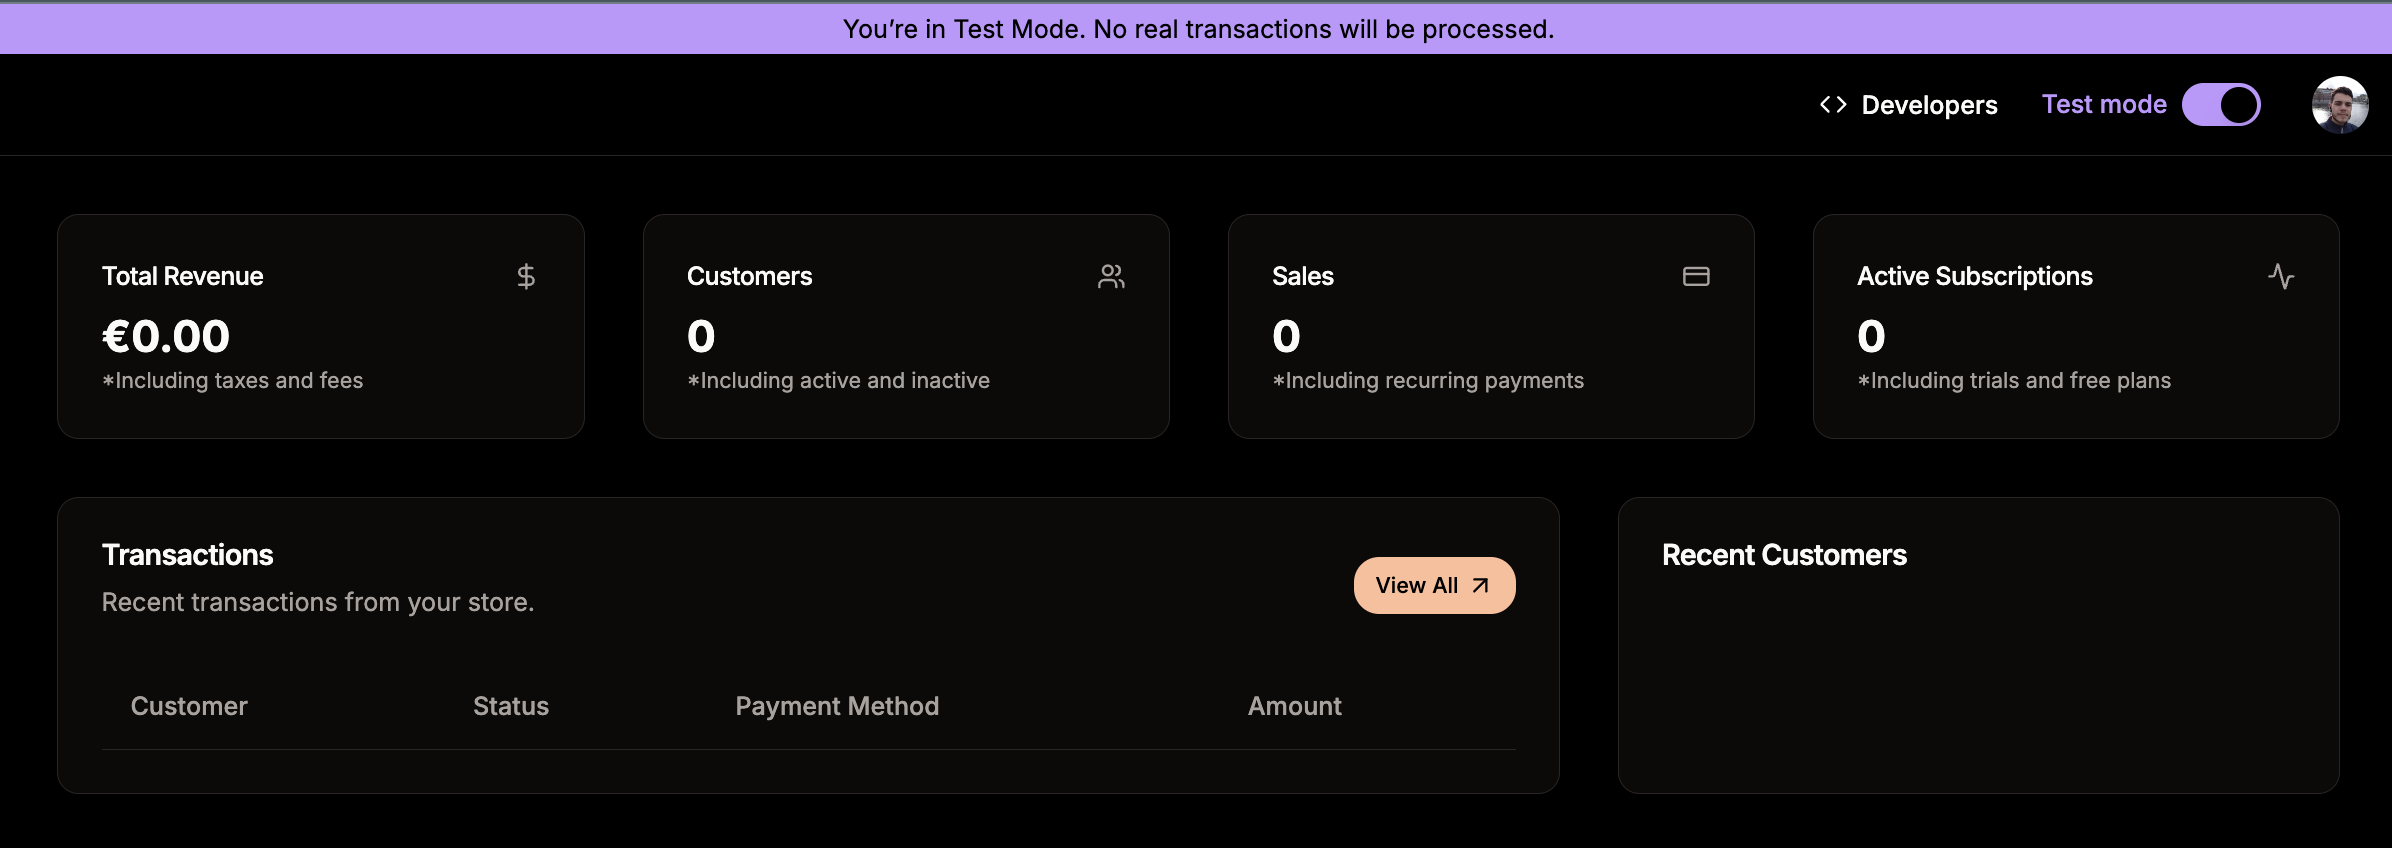 All functionality on Creem will now be in test mode. You can create products, checkout sessions, and receive payments without any real money being involved.
Webhooks and API keys that you will see on the Developer tab will also be exclusively for the test environment.
## Using Test APIs
You can test and use any workflows for the test environment by using the test API endpoint:
```bash
https://test-api.creem.io
```
## Testing Payments
Use the test card `4242 4242 4242 4242` with any expiration and CVV
All functionality on Creem will now be in test mode. You can create products, checkout sessions, and receive payments without any real money being involved.
Webhooks and API keys that you will see on the Developer tab will also be exclusively for the test environment.
## Using Test APIs
You can test and use any workflows for the test environment by using the test API endpoint:
```bash
https://test-api.creem.io
```
## Testing Payments
Use the test card `4242 4242 4242 4242` with any expiration and CVV